
This is a quickexercise using Adobe® After Effects® to create movementin the words of a video title. This exercise should take about half an hour tocomplete, even if you’re not familiar with After Effects. You can also createmuch the same effect in any number of other pixel-manipulating programs thatuse the fourth dimension of time.
An effective,simple, and time saving method for getting people to remember words on a screenis to make the words move. They don’t have to move much, just grow or spreadapart, which you do by increasing the kerning, that is, the space between theletters. You can also create movement by rotating letters, etc. Moving wordsare easier to remember because they are animated. Humans tend to remembermovement.
For this quickexercise, you’ll need After Effects or your favorite editing program, such asAdobe® Premiere® Elements, Adobe® Premiere®Pro, Sony® Vegas™, or Apple® Final Cut®or Final Cut Pro®. They all work the same, although some of thedetails in each program might be different.
After Effects isavailable for both the Mac and PC and matches from one platform to the other.You can get a 30-day, fully functioning demo version from the Adobe Web site.So open After Effects – and away we go.
Step-by-step instructions
- In After Effects, open a new composition (Ctrl/Command + N) and call it “Water” (I’m going to animate the word “Water,” so that’s what I chose for the title). The Composition Settings dialog will open. Make the composition 720 X 480 with duration of 10 seconds. Click OK. (See Figure1.) Note: on the Frame Rate line, you can set any value you’d like, but if the composition you’re working on is going to be shown on a traditional TV, make sure it’s set to 29.97 frames per second.
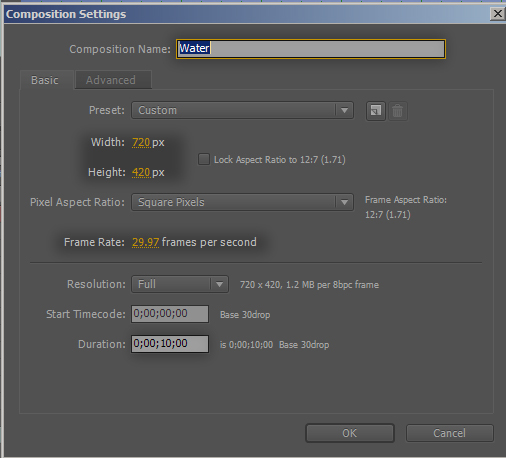
Figure 1: TheComposition Settings dialog
- Select the Type tool (Ctrl/Command + t or the “T” on the toolbar) and in the Type box select any font you want to use. I chose Adobe Garamond.
- Type a word. Any word. I used the word “WATER” because of the background I happened to have handy. I’ll show you how to put the background behind the word in a later step.
- Choose the Select tool (you’ll probably need to do this with your mouse, since pressing the ‘v’ character will type it into your composition).
- You’ll now see “Water” in your timeline as well as on the screen. This is where the fun begins. (See Figure 2.)

Figure 2: Timeline withtext for animation entered
- Look in the Text Controls pane (see Figure 3; by default, it’s on the right-hand side of the After Effects window). This is where you choose the font and size of your text. Size is set in pixels (px). Directly to the right of the text size is an icon with up and down arrows and below that is one with arrows that go left and right. The upper box controls leading, which is the space between lines of text (if you’ve got more than one line). The lower box controls kerning, which is the space between characters within words. The default is Auto for the leading and 0 for the kerning. If the word you typed in looks good, leave it alone.
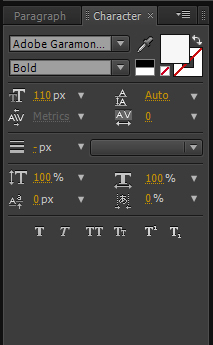
Figure 3: The TextControls pane
- In the Timeline window, click on the little right pointing triangle (it’s actually called a “twirly”) to the left of the name of the composition. The triangle will rotate to point downward and you’ll see two lines appear with twirlies of their own. (See Figure 4.) Welcome to After Effects! Twirlies everywhere. The two lines below the main composition line are Text and Transform.
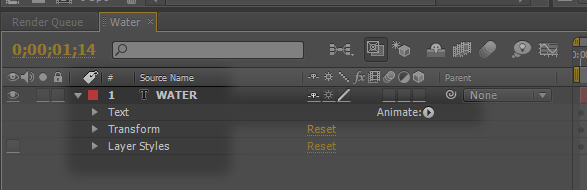
Figure 4: The timelinewindow
- To the right of » Text, there’s a little button titled “Animate:”. Click on that and choose Tracking. Now a whole bunch of rows appear but we’re only going to be concerned with Tracking Amount. To the left of Tracking Amount, you’ll see a stopwatch and the tracking amount set to zero. (See Figure 5.) The timeline hasn’t been touched during this exercise, so it’s at the zero mark too.

Figure 5: Setting up theanimation.
- Click on the stopwatch. A little yellow diamond-shaped marker will appear on the timeline at zero. (See Figure 5 again.) Now grab the Current Time Indicator (that’s the large yellow shield shape at the top of Figure 5) with your mouse and drag it to the end of the composition. Then move your cursor over the “0” in the tracking amount and you’ll see a double-headed arrow. If you click and drag that arrow, you can drag to the right so that the word “Water” spreads out. When the first and last letters are almost at the edges of the screen, let your mouse go. At this point, you can play with the Current Time Indicator by moving it back and forth – you’ll see the animation move back and forth. Play with these settings for a while. You’ll easily see how this works.
Finishing touches
We’re essentiallydone, but I couldn’t use this for anything the way it is, so I want to add afew things before we leave the editing session.
- I’m going to put in a video background. To do this, all I have to do is go to File Import (Ctrl + I) or double-click in the project window, find my file (almost any video format will work) and click OK. I’ve got a Quick Time file of a water drop in slo-mo, so I’m going to import that file.
- Once the video file is imported, all you have to do is either drag it to the timeline or to the composition (screen) window. Size it as you want and you’re done.
Now there are justa couple of touch ups left to do. First, the word looks flat and it just sortof floats over the background video image. To fix this, highlight the part ofthe timeline that has the letters. Then right click and select layer styles.You’ll see Bevel and Emboss as one of the options. Select that. In the finishedexample, I left this on the default settings, but it can be fun to play withthe settings by twirling down the bevel and emboss option.
Also, I want theword to be more a part of the background, so I’ll go back, right click on thetext part again (in the timeline, not up in the project window) and selectBlending Mode, and then Overlay. You can try any of the modes you want andexperiment. Then I set the Fill Opacity to about 40% and now the letters arepart of the droplet.
And finally, I’llmake one last enhancement. Since this movie loops, I wanted the letters to fadein at the beginning and out at the end. It’s very easy to set this up. With thetimeline marker set at the zero point, click the twirly next to Transform underthe word. Click on the stopwatch next to Opacity and set it to zero. Then movethe timeline cursor to about one second and change the Opacity to 100. Thenmove the timeline cursor to the nine-second mark (it doesn’t have to be exact)and notice that to the left of the stopwatch there’s a left-facing arrow, alittle dot and a right facing arrow. These marks move or add differentkeyframes. Click on the little dot and you’ll see another yellow diamond shapedmarker appear where the cursor is on the timeline. You’ve just created anotherkeyframe marker at that point. Move the timeline cursor to the end and changethe Opacity to zero and you’re done!
Publishing the finished movie and title
If you want this to be Web ready,just click on File → Export → Adobe Flash Player (swf) and it will exportdirectly into that format. Alternatively, you can drop it in a bigger projector export it as an xfl file directly to Flash.
There you have it.This article took way longer to write than it did to create the title. Onceyou’ve done this kind of thing two or three times, you can knock a simpleanimated title out in about 10 to 15 minutes.
Happy creating!