Lectora from Trivantis is not a newcomer to the eLearningdevelopment tool market. In fact, it’s been around since 1999. However, thelatest version, version 11 (actually 11.1 as of last week), has been overhauledfrom the ground up, so much so that it feels like a brand-new tool.
Four products, one package, ease of use, and power
Lectora Inspire actually contains four separate products:
- Lectora, which is the authoring tool
- Camtasia, a video-capture tool thatalso lets you edit video and audio
- Snagit, for capturing screen images,with lots of options
- Flypaper, a tool that allows you tocreate Flash animations that you can use as learning objects
Lectora has a fervent user base, not surprising consideringhow long it’s been in the market, but another reason for its success is that ittruly balances ease of use in its user interface while allowing a lot of powerunder the hood for those who wish it.
While I played with Lectora several years ago, I had notused it much on client work. Back then I thought it a bit limited. However,recently, at The eLearning Guild’s Learning Solutions Conference, I led one ofthe three Learning Stages and saw Daryl Fleary give a demo of Lectora Inspire.My right eyebrow shot up in an involuntary imitation of Star Trek’s Spock. This was a different Lectora from what Iremembered, one I would certainly not mind trying.
When you start Lectora, you have a clean interface thatgives you several options (Figure 1). As you can see, you can launch Camtasia,Flypaper, or Snagit immediately, and you can access a number of learningresources. You can also choose to start Lectora with a blank file, use awizard, or use a template you’ve already created. In addition, you can startwith a PowerPoint file or access templates that are available online.
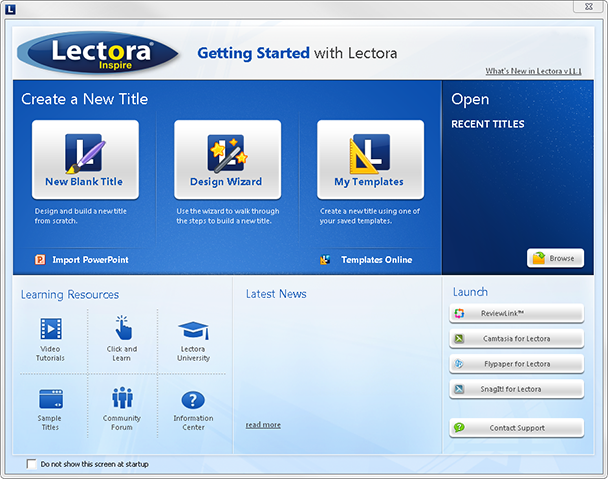
Figure 1: The Lectora Inspire opening panel
Lectora
I will focus my comments on the authoring tool itself, noton Camtasia, Flypaper, or Snagit—except to say these products are well known,have also been around for a while, and are all well regarded by their users.
Once you choose an option, interestingly, if you close afile that you’re working on and then create a new title, Lectora provides amore complete and open menu for opening a file or creating a new file (Figure 2).
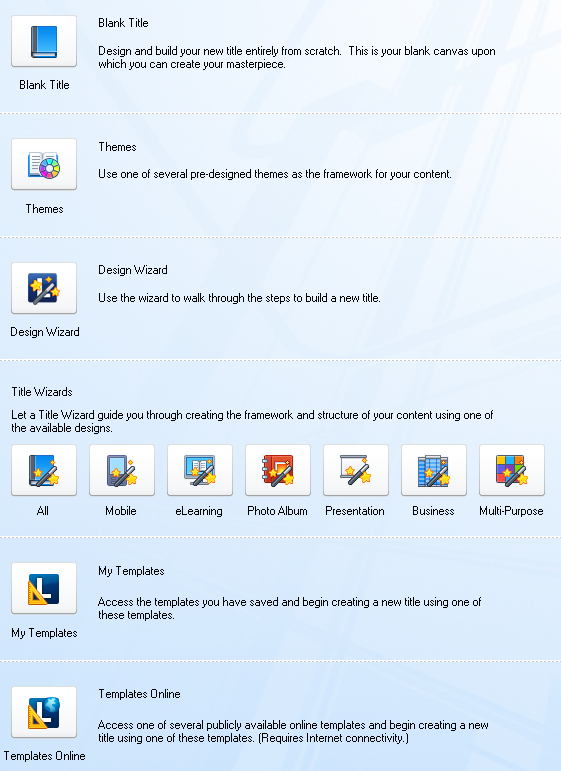
Figure 2: More options to create a new title
Design Wizard
The Design Wizard is the natural choice for those who wishto get a quick start. It’s a good way to get started, but it won’t take you allthe way to the very end. There’s a good reason for this. It’s virtuallyimpossible for any wizard to cover all the possible eLearning approaches anddesigns that a user might need. The Design Wizard covers the basics and makessure that you get a leg up. The wizard helps you set up the frame size for yourtitle and sets up the organization either as a series of pages or pages dividedinto chapters (Figure 3). It also establishes other important attributes ofyour file.
Figure 3: The Lectora Design Wizard
When you click the Build It! button in the Design Wizard,you get a WYSWIG stage and a Title Explorer, where you can alternate between athumbnail view (similar to PowerPoint) or a breakdown of each element in yourtitle (Figure 4). This helps you stay organized and grounded.

Figure 4: The Lectora interface
Ribbons full of features and options
The new interface in Lectora borrows from the MicrosoftOffice approach of using ribbons of tabbed options at the top. This makes it acomfortable environment for most users and allows them to get up to speedquickly.
In a short review, it’s impossible to cover every feature inLectora, because it’s sure jam packed with them. The best way for me to quicklyillustrate the features available in Lectora is to show … well, illustrations! Figure5 shows the ribbons available in Lectora, and most of the options available onthe ribbons are pretty easy to figure out. Notice some of the unique featuresthat you won’t easily find in other authoring tools, such as the ability toinsert QR codes (those funny images you can scan with your cell phone and thattake you to websites).


Figure 5: All of the Lectora feature ribbons
Even with all of the features you see above, there are stillothers. For instance, on the right-hand side of the stage, you can expand threeoptions: Live Resources, My Library, and Stock Library (Figure 4). At thebottom of the interface, there are options for switching between Edit Mode,Preview Mode, and more.
Question types
I want to make sure I point out one additional feature thatwarrants attention in Lectora, because I know a lot of you will want to know thequestion types you can create. Figure 6 shows there are quite a few available.
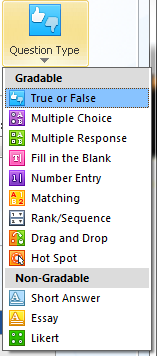
Figure 6: Question Types
All in all, there is a LOT here to digest and to like. Thedifferent features not only let you create eLearning quickly but also give youextra power and features to create flexible and powerful branching mechanisms.
Limitations of Lectora
Like every tool, Lectora has its limitations.
- Itlacks a timeline, such as you find in several products that compete withLectora. Yes, you can set the timing of elements, but it’s not quite as straightforwardas using a timeline.
- I’vecommunicated with Lectora customers, and their comments run the gamut fromgushing praise to strong criticism, primarily in the attentiveness of some ofthe Lectora tech support personnel. I think Trivantis should focus on improvingtheir tech support.
- Whileusing Lectora, it did crash once. That was a bit disappointing. The productdoes put up a dialog box asking you to describe what you were doing when itcrashed, and uploads the information to Trivantis (with your permission), sothey do take bugs seriously.
Lectora costs $2,495 per developer. You can purchasetechnical support, available 24 hours a day, for an additional $295 when youpurchase Inspire. There are no other fees.
Learn more and see demo courses at Lectora.com.