In June of 2016, ADL announcedthe release of cmi5, the next generation of LMS-to-online contentcommunication. The specification defines a set of rules for using xAPI in the“LMS launches content” scenario. ADL recently released a comparison of cmi5and SCORM, highlighting the advantages and capabilities of cmi5. The benefitsinclude elimination of pop-up windows, distributed content, and a more flexibledata model than SCORM.
While many vendors have announced that theyplan to support cmi5, and some LMS and content tools have released versions oftheir products that incorporate the specification, what if your particularcontent tool does not yet support cmi5? Can you still take advantage of all thebenefits?
The short answer is “yes.” This article willdiscuss how we added cmi5 to HTML5 content using free script libraries.
Why cmi5?
At its core, xAPI is a data transport andstorage mechanism. By itself, xAPI was never intended to replace SCORM. Infact, the term LMS never appears inthe xAPI specification. So what if you still want to launch content from anLMS, but take advantage of xAPI? To address this need, ADL developed cmi5. (Thecmi5 effort was originally started by the Aviation Industry CBT Committee, orAICC.)
Let’s take a quick look at some of thesebenefits we mentioned earlier.
Pop-up windows
If you have ever supported students using yourLMS, you know one of the most common student issues is “I clicked the startbutton and nothing happened.” You know that you are now on the hunt for thedreaded “pop-up blocker.” Often, you’ll find more than one pop-up blockerinstalled on a student’s workstation. Each has to be either removed or modifiedto allow SCORM content to open. With cmi5, it is possible to completelyeliminate pop-up windows for content launched from your LMS.
Distributed content
It seems like SCORM content has gotten biggerand bigger as the internet has gotten faster. Typically with SCORM, all yourcontent is loaded on your LMS server. If your LMS and your students are locatedin the same area, there’s no problem with this. But what if your students areall around the world and your LMS server is in Atlanta? When a student inLondon launches your content from Atlanta, it is going to be slow. Wouldn’t itbe great if you could put your eLearning on a content distribution network, allowing students to download the content from a server close tothem, wherever they are? With cmi5, you can.
Store any data you want
While the SCORM data model is big, it is notextensible. You are basically out of luck if you have a need to track somethingthat is not part of the SCORM data model. Since cmi5 is based on xAPI, you canuse extensions to store any data you want.
Our scenario
The Public Health Informatics Institute’s (PHII)Informatics Academy, part of the Task Force for Global Health, developed aninnovative, informatics capacity–building module using Adobe Captivate. Themodule included training about the critical success factors of an informaticsproject with a dashboard-enabled, reusable self-assessment tool (Figure 1).

Figure 1: The informaticsproject’s dashboard-enabled, reusable self-assessment tool
To capture data from the self-assessment tool,PHII decided to leverage xAPI. This allowed for real-time data capture on howpublic health agencies rated their informatics capabilities at the projectlevel. The data provides insight on additional support the agencies need to besuccessful.
This project started with content originallycreated in Adobe Captivate 9 and published to HTML5. The content had alreadybeen set up to send custom xAPI statements using JavaScript within AdvancedActions (see Sean Putman’s article “Captivate JavaScript xAPI Customization”). As in the linked article, JavaScript wasentered into Captivate, but in this case ADL’s “xapiwrapper” JavaScript librarywas used instead of the TinCan script library.
There were some problems with the initialapproach:
- The LRS endpoint, as well as thecredentials to write to the LRS, were “hard-coded” in a script file. While thecredentials were encoded, this was not as secure as we would have liked.
- There was no way to consistentlydetermine the “actor” since the content was not attached to any credentialingsystem. Sure, we could have prompted the user to enter an email address, butmost people have more than one email address and this would have producedinconsistent reporting. PHII wanted the ability to tie data collected to uniqueusers in their LMS.
- There was no consistent method ofreporting context for the activities to be tracked. The context property of thestatement had to be hand-entered into each custom script in Captivate.
The solution: cmi5
To solve these problems, we converted thecontent to cmi5. We did this using a free JavaScript library from RISC.(Note: This library depends on xAPIJavaScript libraries from ADL as well as jQuery.) This provided the followingbenefits:
- In cmi5, the LRS endpoint ispassed to the launched content. All we had to do was read the endpoint from thelaunch URL and store it in a global JavaScript variable. We could then use thatvariable when sending xAPI statements.
- Security in cmi5 is handledthrough a one-time-use token. This provides two security benefits:
- The only way the user can accessthe content is to go through the LMS credentialing process.
- Since the token can only be usedonce, the user cannot “bookmark” the content link to bypass security.
- The actor, registration, andactivityId are also passed on the launch URL, so we can again save these valuesto global JavaScript variables and use them throughout the content. There aretwo advantages to this:
- Since the content is now beinglaunched from the LMS, we don’t have to worry about the consistency of theactor properties.
- Since the registration is createdby the LMS, rather than the content, we know it will consistently map to othervalues in the LMS. For example, if there are other content modules in thecourse, the registration value will allow us to report activity for a singleuser across all the modules.
- In cmi5 there is a concept called Publisher ID. This is a valuethat uniquely identifies the content across all systems. Suppose you want touse the same piece of content in multiple courses or across multiple LMSs. Itwill have the same Publisher ID each time, so you can compare results acrossall places where the content is used.
Getting started
To use these free script libraries, we justhad to reference some JavaScript files at the top of our published contentmodule:
<!DOCTYPE html><html lang="en"><head><meta name='viewport' content='initial-scale = 1, minimum-scale = 1, maximum-scale = 1'/><meta http-equiv="Content-Type" content="text/html; charset=utf-8" /><meta http-equiv="x-ua-compatible" content="IE=10"><title>Critical Success Factors for Informatics Projects</title><style type="text/css"> #initialLoading{ background:url(assets/htmlimages/loader.gif) no-repeat center center; background-color:#ffffff;position:absolute;margin:auto;top:0;left:0;right:0;bottom:0;z-index:10010; }</style><script type="text/javascript" src="Getcmi5Scripts.js"></script><script type="text/javascript" src="cmi5Callbacks.js"></script>Note: These scripts get dropped into our content AFTER publishing it toHTML5.
So what do these scripts do for us?
- They load all the externalJavaScript files that we will need to send cmi5 statements. These include thecmi5Controller library from RISC and the two libraries from ADL for sendingstatements.
- They set up several globalvariables that we can use in our code. These include the “actor” for ourstatements.
- They get the security token wediscussed earlier.
- They automatically set up theconfiguration for sending xAPI statements using the ADL library.
- Finally, the required cmi5“Initialized” statement is sent to the LRS.
Sending other xAPI statements
So at this point we are fully initialized forcmi5, and now we are ready to send custom statements. For example, when astudent chose an answer from the screen shown in Figure 2, we wanted to recordthat selection with xAPI. How can our cmi5 library help us with that?
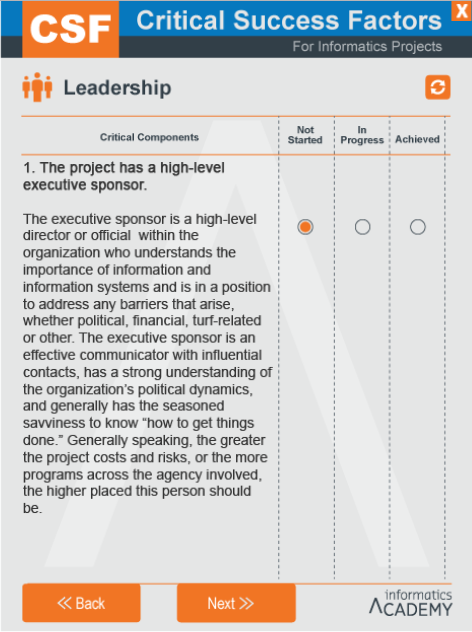
Figure 2: The cmi5 library canhelp us record “Not Started” for this item
The script below is associated with the “NotStarted” answer for this question. It will send our desired xAPI statement. Wecreated similar scripts for the other questions and answers.
stmt = newADL.XAPIStatement();stmt.actor = actor;stmt.verb = ADL.verb.answered;stmt.object = newADL.XAPIStatement.Activity('https://www.phii.org/leadershipq1', 'LeadershipQ1');stmt.result = { 'response': 'Not Started' };stmt.context = cmi5AllowedContext;var resp_obj = ADL.XAPIWrapper.sendStatement(stmt);For this to work in cmi5, we need to usesomething called “cmi5 allowed” statements. These are xAPI statements thatconform to certain minimum rules. Mostly, this involves having particularvalues in the Context part of a regular xAPI statement. Our RISC cmi5 libraryautomatically creates a global variable that we can use in our statements tomeet this rule; we just had to set our context in JavaScript as shown on thelast line of the example above.
We can still add other Context properties ifwe wish; this is just the minimum to conform to cmi5.
To associate this script to an answer inCaptivate, you perform the following (see Figure 3):
- For this scenario, theScript_Window was set up in the advanced action. In other scenarios you cansimply make the button (or SmartShape being used as a button) call theScript_Window to run the JavaScript.
- Click the Script_Window button toopen the JavaScript window and enter the script needed to create the statement.
- Once the script is entered, click theOK button to save the JavaScript in the window.
- If using an advanced action, savethe action to complete the setup.

Figure 3: The Script Window inCaptivate
Once the setup was complete and the projectwas published, the .js libraries described earlier were copied into thepublished folder. The final step in the process was to add the scripts to callthe libraries into the head section of the .htm file for the publishedCaptivate project.
Results
Table 1 shows the statements from the LRS. Thewhite row is a cmi5 allowed statement; the others are cmi5 required statements.
Table 1: Statements from the LRS

So what’s that crazy value in the AuthorityName column? That is the one-time-use token that we described earlier.
Here is the resulting JSON for our “answered” statement.
{ "version": "1.0.0", "id": "af4a596b-3476-4973-8e30-e8848c8796f4", "actor": { "objectType": "Agent", "name": "Werkenthin,+Art", "account": { "homePage": "https://www.informaticsacademy.org/LearnerConnection/", "name": "0000100087" } }, "verb": { "id": "https://adlnet.gov/expapi/verbs/answered", "display": { "en-US": "answered" } }, "object": { "objectType": "Activity", "id": "https://www.phii.org/leadershipq1", "definition": { "name": { "en-US": "Leadership Q1" } } }, "result": { "response": "Not Started" }, "context": { "registration": "46e3bb5a-7ad2-49a9-9363-443019003c81", "contextActivities": { "grouping": [{ "objectType": "Activity", "id": "https://www.informaticsacademy.org/activities/csf/v1/1" }] }, "extensions": { "https://w3id.org/xapi/cmi5/context/extensions/sessionid": "71" } }, "timestamp": "2017-07-13T14:39:42.659Z", "stored": "2017-07-13T14:39:42.659Z", "authority": { "objectType": "Agent", "account": { "homePage": "https://www.informaticsacademy.org/phii/", "name": "591c809b-574a-44df-b205-d6882c49a4c5" } } }Returning to the LMS
Earlier we talked about how cmi5 can eliminatepop-up windows. When our content was launched, the LMS went away and thecontent appeared in the same window. This means we had to add a “return to LMS”button to the content. Otherwise, when the user was done they would have no wayto get back to the LMS. So, we added a SmartShape button at the top right ofeach screen. In the on-click Action, we execute the JavaScript below. Our codealso sends the cmi5 “Terminated” statement.
SendCMI5DefinedStatement(“Terminated”);document.location.href = GoLMS();
The GoLMS() function was provided by the RISClibraries. This simple function call returned us magically to the LMS, rightwhere we left it.
Summary
In this article, we described a use case foradding cmi5 to existing xAPI content. Our content had some security issues thatwere easily solved with cmi5, and we were still allowed to send all the xAPIstatements we needed. While it required some expertise in JavaScript, it wasrelatively easy to convert the content; we finished the task in about a day oftrial and error. Since we used free, easily available libraries, this approachcan easily be reused with other content.
Next steps
Our goal with this project was to see howpublic health agencies rated themselves on certain critical success factors. Wewill continue to monitor and evaluate the data collected. This will help us toidentify whether there are any other opportunities to capture additionalhelpful data, as well as determine the need to remove unnecessary statementsthat are reporting from the project. We also plan to set up a dashboard withdrill-down reporting to better visualize our results. This will allow us tofind the factor areas where public health departments are experiencingchallenges. Then, we can use that data in conjunction with other information todetermine specifically where we should provide additional training and supportto better help these agencies.