Adobe has just released its latest version of Captivate,dubbed 2019, and once again Adobe has not been content with just adding a fewsmall features. Rather, Captivate now boasts several new capabilities thatother tools simply don’t contain or that other tools offer at much higher cost.In fact, Captivate’s subscription cost is still only $29.99 a month. It’s oneof the best deals on the market, especially when you consider the amount ofpower under its hood.
What are the notable new features?
New file types
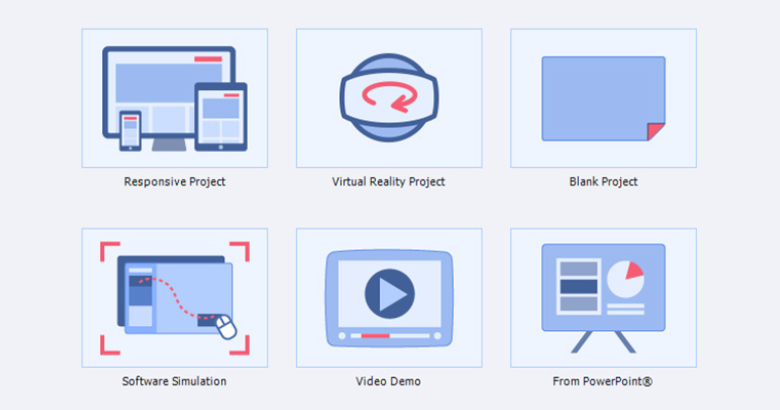
Open Captivate 2019 and you’ll immediately notice a new typeof file among the new ones available: Virtual Reality Project. See Figure 1.
Figure 1: Virtual Reality is a New Offering of Captivate 2019
As always, the six types you see in Figure 1 represent themost common ones. Pull down the File menu and you’ll also be able to choosefrom other file types, as you can see in Figure 2.
Figure 2: Different File Types
Despite the fact that you can create a lesson that is entirelyset in Virtual Reality, is created from a PowerPoint file, or is aSoftware Simulation or Video Demo, you can also insert individual slides thatare of these types into a normal desktop project, which means you can createlessons made up of these different kinds of learning. See Figure 3.
Figure 3: Slide Types You Can Insert
VirtualReality? Yes, please.
Yes, you can now use Captivate to create interactive virtualreality and interactive 360° videos. Insert a JPEG or PNG image file or an MPGvideo that were created and saved as 360° and you can add as many hotspot interactionpoints as you wish. You do this by choosing from a set of icons (See Figure 4) thatare provided or by adding your own image to superimpose on the image or video.
For learners to navigate the virtual reality environmentsyou create, they can use a virtual reality headset or use a desktop computer.Using a headset provides a more realistic experience. However, using a mouse tomove around a scene on a desktop is also an effective way to take a lesson.
Figure 4. Hot Spot Icons
Each icon that you place on the stage can result in a numberof actions, as can be seen in Figure 5.
Figure 5: Interactions and Questions
InFigure 6, for instance, I have inserted a 360° image of a control room (one ofthe sample images that Captivate provides). You can see two angles of thecontrol room. In the first angle, you can see three icons, two text icons andan exclamation point. On the second angle, there is a Q icon.
Figure 6: Two angles from a360° image with interactive icons
While you can have any of the icons from Figure 4 (or yourown image) trigger any of the actions in Figure 5, naturally learners mightexpect T icons to show text notes, an exclamation point to show a warning ofsome kind, and a Q icon to show one or more questions, so you will probablywant to tie each to the expected action.
Figure 7 shows an example of a question that has beentriggered by the learner clicking a hotspot. Depending on the learner’s currentview, the question may come up at an angle, but the learner can then simplyreposition the question to see it front and center.
Figure7: A question pops up
AnyVirtual Reality slide can be set to Guidedor Exploratory.
- Guided: The learner will start at thefirst hotspot and must view it, after which the scene will show an arrow forthe learner to click to move to the next hotspot.
- Exploratory:The learner has the freedom to move around the scenes and choose the hotspotsin any order.
You can also mark any hotspot as Must View Once to force learners to click it before jumping awayfrom the view.
To watch the Virtual reality lesson on a headset, you canchoose Live Preview on Devices fromthe Preview options (Figure 8). Captivate will show you a QR code that you canthen scan with your device. As long as your device is on the same wirelessnetwork as your computer, you’ll be able to experience your lesson on yourdevice. In fact, everyone on your wireless network will be able to see thelesson on their devices.
Figure 8: The Live Preview on devices provides a QR code thateveryone can use
So what’sthe big deal?
The Virtual Reality feature in Captivate 2019 is a realgame-changer. It allows you to easilycreate lessons that can be viewed on devices or on desktops and that can propelthe learner to a better understanding of how to address situations in reallife. Of course, Virtual Reality isn’t something you will want touse for software training or with many other learning needs. However, considerhow muchmore effective it can be for real life scenarios that learners mustgrasp before performing certain tasks in reality. Now Virtual Reality lessonscan stand alone or be mixed with other types of slides.
Next month
Captivate 2019 includes several other new features. I’ll becovering those next month, including:
- True interactive videos with overlay slidecapability
- CSV question import (in addition to GIFTquestion import)
- Screen recording with webcam with chromakeycapabilities
- Easier fluid boxes for responsively designedlessons
- PowerPoint to mobile learning
- Automatic device preview