
In thisarticle, I explore one of the ways you can use Articulate Storyline to makepersonalized learning that adapts to your learners. A lot of the same conceptscan apply to Adobe Captivate or Lectora.
Earlier thisyear (July 18, 2016), I wrote in LearningSolutions Magazine about two different ways of personalizing eLearning. Thatarticle introduced the concepts behind those methods, and I will begin bysummarizing them briefly here.
Wayto personalize your content #1: The xAPI
The first wayto personalize content is to use the Experience API (xAPI) to store a learner’sactions. This allows you to track what the learner is doing and learning. Youcan also use the history (the actions that you tracked) to adapt and adjust futurecourses. In this way, you can meet each learner’s specific needs based on individualhistory. For example, suppose you can see in someone’s learning record store(LRS) that he or she has looked at a lot of videos about “Topic 1” but not muchabout “Topic 2.” The learner has already reviewed a lot of content related toTopic 1. Given this, you could then adjust your course programmatically toserve up more on Topic 2 and less on Topic 1. However, today you cannot easily lookinto the LRS and see the learner’s history with standard eLearning tools. Itdoes take some custom programming. The xAPI is a good option, but in order toadapt your course based on the information in the LRS, you must have the necessarydevelopment skills. So what other options are available?
Way to personalize your content #2: “Get to know you” quizzes
While I thinkwe shouldn’t be afraid of learning code, I do recognize we don’t all know howto code. Another option is to modify your course based on information you areable to gather from the learner.
In my earlierarticle, I introduced a company called Consensus.This company caters to sales organizations that do a lot of software demos. Theirtool automates and personalizes sales-demo videos to match what the user islooking for, freeing up the sales person’s time from having to do a lot of softwaredemos.
How do they dothis? They get to know the user. Before showing any demo, they ask learners to answersome questions: what they are looking for, what they already know, and someother information. Based on the responses, Consensus will serve up differentsections of the demo to customize the experience to the specific user.
Now, thedeveloper of the demos still has to create different versions of the demo: anin-depth video, a moderate version of the video, and a light, quick version ofthe video. Suppose one of the subjects or sections of the demo is on how tostore a record. The program would ask about the learner’s interest in this. If thelearner indicates only mild interest, then the program would serve up only themoderate video and not the in-depth portion or lighter version.
How does this apply to learning?
This worksgreat for software demos, but how does it apply (or does it apply at all) forlearning? If it applies, how do we develop our courses in this way?
Of course itapplies to learning. In fact, in most authoring tools on the market, this iseasily done. Before even presenting the users with any content, we can ask afew questions (or quiz them) on what they already know about the subject. Withinthe course, there could be in-depth, moderate, and light versions of eachtopic. Based on the user’s answers, the program could adapt or adjust the course.
There issomething to be said for personalizing content to the user. I think end userswould find the content more relevant and engaging if we avoid always doing a“one size fits all” kind of course, instead giving them only the information relevantto what they need to know.
Making this work in Articulate Storyline
There are a lotof different approaches you could take to this within any eLearning tool, butlet me walk you through how I would do it using Articulate Storyline. The wayto get the job done is to use variables and triggers inside of Storyline. If youare not familiar with variables and triggers, I recommend checking out the tutorialsavailable online.
In the firstpart of the course I, as the developer, need to set up variables and a seriesof questions that will adjust those variables. I’ll begin by setting up a Storylinevariable called “section1.” The program will use that variable tocontrol which version of the video demonstration the learner will see for thefirst section of the course, based on how much the learner says he or she knowsabout the topic. Setting up the variable is simple: Just name it. (Figure 1.)
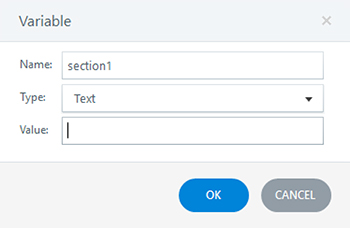
Figure 1:Setting up a variable in Storyline
Variables arelike buckets or bins: They hold whatever data you program Storyline to put inthem, specifically, true/false, numbers, or text. section1 is going to be a text variable. It will be a text variablebecause I want it to hold one of three possible values: “heavy,” “medium,” or“light.” Heavy stands for more in-depth content, medium for moderate content,and light for just a quick review of the content. All of this will be based onanswers the learner gives to questions from the program.
Now, I’ll createa question page inside of an intro scene. (Figure 2.)
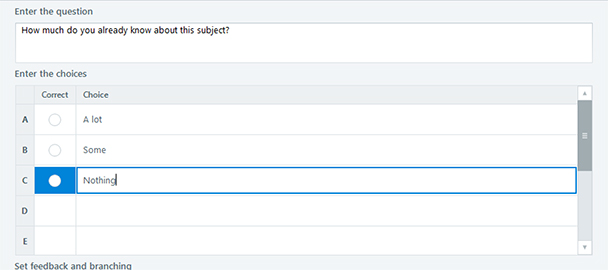
Figure 2:Creating a question page inside an intro scene in Storyline
I am not goingto use this in the same way we use traditional quiz questions, so I am notactually going to select a correct answer. Instead, depending on what a userselects, I am going to adjust the section1variable.
If the learnerselects choice A, then the program sets variable section1 to “light” because the learner already knows a lot aboutthe subject. If the learner selects choice C, then the program will adjust section1 to “heavy” because the learnerknows very little about the subject and needs to get the more in-depth content.
Now that I havethe variable and the question set up, I’ll set a trigger for each of the choicesin Figure 2 to adjust the variable section1.(If there were a lot of questions, it would require a little more work than I’mshowing in this example.)
Figure 3 showshow to use Storyline’s Trigger Wizard. In this figure, if the user selects choiceC (“Nothing,” which is Radio Button 3 in Figure 2), then Storyline will adjustthe variable section1 to “heavy.” Readthe entries in Figure 3 from top to bottom to see how this works: Adjustvariable section1 by assigning it the value “heavy” whenthe user clicks Radio Button 3.
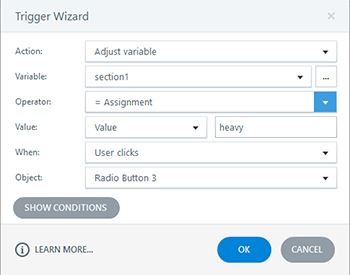
Figure 3: Usingthe Trigger Wizard in Storyline to adjust the variable named “section1”
In the sameway, I would use the Trigger Wizard two more times to set triggers for theother options (“A lot” and “Some”: Radio Buttons 1 and 2). Once that iscompleted, the program could jump the learner to the “heavy” version of thevideo, the “light” version, or the “medium” version, depending on the user’sself-reported knowledge of the subject. Yes, this does require more development,but it gets us away from the one-size-fits-all course.
So in my storyview (Figure 4), I created these three scenes for Section 1. From here I jumpto the correct version of the scene based on the answers in the introductionsection.

Figure 4:The story view of the course in Storyline
So the Next or Submitbutton in the introduction would jump to the scene based on the value of thevariable. Figure 5 shows what that trigger might look like.
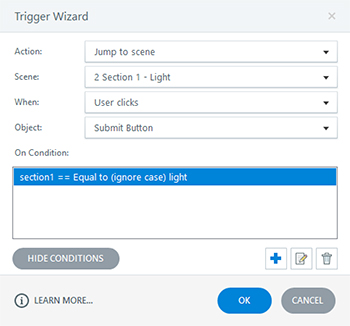
Figure 5:The trigger button causes a jump to the light video of the course in Storyline
So that triggerwill only run if the variable of section1is equal to light. Then I would need two more triggers, one jumping to theheavy section and one jumping to the medium section based on the value of thevariable. From here, you would just need to set up more questions for the introquiz and more sections, each with different versions of each section.
All this is just scratching the surface, buthopefully that gets you pointed in the right direction for how you could startcreating adaptable or personalized learning for your students. As always, letme know your feedback or questions!