


You’re probably making some video (maybe a lot of video) foryour eLearning courses these days. But are you making the best use of video? Itcan engage your learning audience in so many different ways. Are you stuck withhaving to “scale back” your video production every time you get an idea? Areyou wanting to do more, but don’t exactly know what you can do to get morevideo into your lessons that isn’t just a talking head? Let’s take a look atsome ways to think about video to make it both practical and to look like youhad a bigger budget than you had.
What’s “practical” mean for you?
Video production is a strange animal. So is audioproduction, so you audio people are not exempt! In a studio, you can controlmost of the environmental variables, but unless you’ve got a big studio and adepartment or workshop where you can create sets, you’re pretty much out ofluck shooting anything other than a talking head, or a talking head in front ofa green screen so you can put a different background behind your talking head. Ifyou’re not a video production company, or a network, you don’t have theequipment and wherewithal to commit to large-looking productions. What do youdo?
Most commercial production houses eschewed shooting in thestudio years ago. Going outside to create video can be a bit scary and it canmake your life, um, exciting sometimes! No matter how well you’ve scouted yourlocations, you’re going to be faced with a bit of the unknown. Hollywood productioncompanies have the money for lots of lights and electricians to light them,sound equipment and people to operate it, video (film) equipment and all the etceterasand whatever goodies you can think of. But even they still have a lot ofunknowns on the set.
This article is about how to control the unknowns and dogreat production every time you make a video. Our audience (I think it used tobe called our “learning audience”) will remember more about a video that’s shoton location than a talking head with flapping lips. Let’s take a look at whatmakes video production practical. I’m going to walk you through the equipmentit takes, and then discuss shooting on location—inside, and outside. I’ll wrapup with my ten best tips.
Equipment
There are two things to know about practical videoproduction: your equipment, and actually going out and shooting the video withyour nice shiny equipment. First comes practical equipment.
I’ve never run across a training department where moneywasn’t an object … a very large object! So let’s take a look at a practicalapproach to equipment with minimal spend for maximum impact.
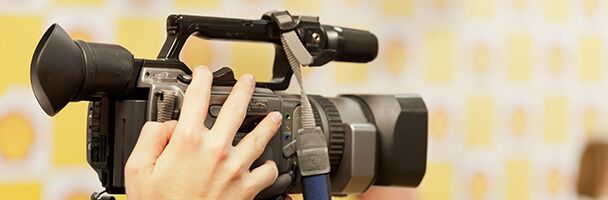
Cameras
Face it, you probablycan’t afford to make video with a Red or an Arri or any other over-$25,000camera. I have in the past, but not recently. The reality is you don’t needexpensive equipment to shoot great video. Do expensive cameras make a difference?It depends. Good lighting makes the biggest difference, as does understanding howto use the camera. If you know how to light well, and have a camera operator whounderstands how to shoot beyond just pressing the start button, you’ll do fine.eLearning video production has to move quickly. We don’t have all the time inthe world to get the best shots to tell the story.
What can do you do with a really limited budget? Let’s go upthe price range. You get an affordable piece of equipment that you can upgradewhen you need to. I still have a Canon XL2 that was state of the art about 10years ago. If you’re still shooting in standard definition (720 X 480 pixels)either as 4:3 or widescreen 16:9 aspect ratios, you can create unbelievablybeautiful images with this camera, and you can get one for about $500 on eBay. Thatincludes an incredible Canon zoom lens that was designed for this specificcamera!
If you’re shooting HD video (why would you be doing that foreLearning?), then your best bet is going to be to buy a new camera. One thingyou can do is get a DSLR (digital single lens reflex camera) like a Nikon orCanon. But you’ll still need a lens. If you want to change focus or theexposure during a shot, you need a lens that can do that quietly. DSLR lensesare generally not designed to changeexposures smoothly without a click between f-stops. And many DSLR lens-focusmotors tend to be loud. A different camera option is to get a Sony HandyCam,Panasonic, JVC, or whatever kind of really portable camera that comes with abuilt in lens. Those are less than $600 to $800.
Another solution could be a Blackmagic Design Pocket Cinema camera. The retail price for one of these is $995. Igot mine on sale for half that! It’s a truly professional camera without a lotof bells and whistles but it can make extremely beautiful pictures. It shootsRAW video, which is incredibly flexible and which you can easily color grade. RAWmeans the video files the camera records are sensor data without any imageprocessing. RAW video requires color grading software (Adobe has it handilybuilt into Premiere Pro CC) in order to be viewable (in other words, pretty).Color grading (or color correcting) is the process of altering and enhancing the color in a video. Thinkof RAW video like old color negative film (if you remember it.) Color film hadan orange mask. RAW video frequently has a green mask. Color grading gets ridof the mask and shows the beautiful color recorded. Here’s an example of what you can get for yourefforts. You still have to buy a lens for the camera, but you can get somereally good video-specific lenses that sell for around $250 to $300. For $1,300or so, you can have a camera that doesn’t take years of training to make thebest use of and that can make video as good as anything out there. Yes, you’dhave to learn some different skills in the editing suite (color grading), butthey’re easy to pick up and make perfect sense once you’ve done them once.
One final note about the Blackmagic Design Pocket CinemaCamera: it is serious professional gear, and it requires appropriate skills toget the most from it. I recommend viewing these videos as part of yourhomework: https://youtu.be/XKFzEBf-K68,https://youtu.be/p3zCOoeweEg, and https://www.youtube.com/watch?v=nlBbT2_pSoA. The bottom line is that to use this camera well, you need to be a bit of acamera geek. Not a bad thing, but it’s got to be something you really want todo.
You’ll also need a tripod and fluid head. A fluid headallows smooth tilts—moving the camera up and down on the axis of the camera—andpans—moving the camera left and right along the axis of the camera. You can geta really good one for under $200, since cameras in this price range are prettylight.
Audio
Here’s an area where practicality can really shine. There’snot much difference between a $1,000 microphone and a $150 microphone if youshop carefully. Audio is a funny thing. Most of your content will be seen on alaptop or tablet. Maybe some of it will even be seen on a phone. But most of itwill be heard through pretty terrible speakers or earphones. The screens aregreat, but the sound isn’t … go figure. While doing webinars, many people tellme that I should just buy a $50 headset. I’ve never heard one of these devicesthat most people use sound like anything other then what they are; a cheapmicrophone that sounds like you’re talking on a phone from the 1950s! So, sadly,the eLearning bar on audio is set pretty low.
But you have to record better than you’ll expect youraudience to hear. A $150 condenser microphone by Sennheiser or other good brandwill do it for you, but read reviews. You’ll also need a mixer and these daysyou can get a really good one for $150 or less. Do not think your camera’s microphone can be used for audio even aslow as the eLearning audio bar is set! You simply cannot depend on the camera’sbuilt in mic to do any kind of a reasonable job. So get a decent mic and amixer and plug that into your camera. Your sound will be great!
I’ve been doing something different these days. I have adigital audio recorder. I use a Zoom H4n. On its own, it’s a really good recorder.It’s small enough to conceal behind something and it’s really easy to syncsound to video even if you record it with a mic through the recorder. In fact,it can be better. A Zoom H4n costs around $200 on Amazon or B&H Photo. Sobetween a microphone, stand or boom, a mixer, and a recorder, you’ll spend about$400, give or take.
Lights and other equipment
You’ll need some lights and reflectors along with some lightstands, etc. Good LED lighting units can be had for under $75 each and if youlook for deals, you can find them with stands for about half that. Three ofthem are perfect along with a $30 reflector kit. The reflectors fold up nicelyinto a little circle that’s easy to transport. The lights are LED (and small),maybe not the best kind of LED (which can be really expensive), but far morethan adequate to get the job done and done well. That’s practical. And becausethey’re LEDs, they’re powered with some AA batteries, so no cables to findpower for and snake around the set. They’re dimmable, too!
Wrapping up the equipment rundown
Now you have a complete kit: camera, lens (or two) for $1,500or under, a microphone (or two), a mixer, and a recorder for a total of about$400, and lights and reflectors for $300 or so. That’s a total of under $2,500(I inflated it for some flexibility). There’s nothing you can’t do that aHollywood production can’t do, except maybe the set-up for special-effectsshots. This is a truly professional HD system that five years ago would havecost $10,000 to $15,000! And with this kit, you can certainly get the whole forless than $3,000 and that includes some pretty good upgrades like a matte box (similar to alarge lens hood) with a big zoom ring and focuspuller (also called a follow-focus rig—it’s quicker for you to Google thisthan for me to explain it). And this is close enough to professionalgrade equipment as to only make a little difference. Enough about practicalequipment. What else is practical?
Well, you still have to edit the video you capture on thoselittle SD cards. For the most part, tape no longer exists. My Canon XL2 usestape, but I now hook it up to a portable hard drive that records directly.Sadly, that camera is now relegated to be a small coffee table in its squarealuminum case. It mostly has a pile of “stuff” on top of it. Ah well…
OK! That’s pretty much all you’ll need to shoot really greatvideo. Learn to use it. There’s all kinds of online stuff you can find abouthow to use just about anything. Some of it isn’t so good and some of it isterrific, just like our training can be.
Shooting on location—inside
Shooting anywhere is where the pedal hits the metal. Onlocation, things can get a little crazy. Even in a not-so-good environment, youcan shoot great video. And it will pay back big time to “scout” your locationbefore you walk in the door with your equipment.
Even if the location isn’t ideal, you can plan yourshooting. Here’s an example for indoor video; Last year, I had to use alocation that was given to me. It was supposed to look like a coffee shop. Itdidn’t. The room was painted black and had 20’ ceilings, which also meant itwould sound live with lots of reverb and echo. And it was a big room. Not atall smaller like a coffee shop. More like a barn. There were four actors in theshot almost all the time too, which exacerbates the difficulty in lighting. Andto top things off for a bad shooting location, there was an enormous picturewindow on the west side of the room. Not bad in the morning, but the sunstarted to stream in as the time moved past noon and things started to get abit more than strange with the lighting. Blocking the window was out of thequestion and I viewed the room early in the day, so couldn’t tell what effectthe window would have on the way the video looked, but I had my suspicions. Iwas right. That window had a really big effect on the way the video looked! SoI had a lousy room, bad sound, and bad ambient light. Ugh.
My solution: For the light, we just quit in the afternoon.We had to. There was just too much light from that window. I lit with four or fiveflood lights just to throw some even light on the subjects. I ran two camerasfrom different angles to be able to mix up the shots. And the sound wasn’tgreat with my condenser shotgun, so I used that little recorder and hid itbehind a napkin holder. The sound was great after that. The shotgun mic hadgood sound, but the recorder was better because I could put it closer. Therewasn’t a lot of light from the floodlights, but I used a higher speed (ISO)than I normally would. Higher ISO usually means more grain, and this did, butit was still acceptable and actually gave the video a kind of grainy, edgylook, which worked for what we were doing.
That was the practical approach to shooting inside in aspace I never would have selected, but hey, that’s the way it goes sometimes.
Shooting on location—outside
While shooting video indoors gives you some control overlighting, sound, etc., outside is a different can of worms, sometimesliterally. The first and foremost thing about shooting outside is to have abackup day. You can’t control the weather unless you have a very large secret. Soddentalent is uncomfortable talent and unhappy talent. You want to keep your talenthappy. Shooting in the rain (unless it’s set up that way, and that has a wholemess of other issues) is not fun at all, unless it’s what you want. In thatcase, I’ll personally guarantee the day will be sunny and bright! So have abackup day.
When you’re shooting outside, you have to deal with thebiggest light bulb of all; the sun. And make no mistake, it’s big. And bright.And often hard to control. This is where reflectors come in really handy.Shooting outside on a sunny bright day is difficult because the shadows aredark and the highlights are really bright. It’s tough given the state ofsensors today. This is what buying an expensive camera brings, a sensor with awide dynamic range.
That little Blackmagic Design Pocket Cinema camera (for allof the comments earlier) comes in handy. Smart phones are usually notappropriate for bright sunny days because their sensors don’t have very muchdynamic range. And the video you get out of the phone can have too muchcontrast to be very useful. Reflectors can do a lot to mitigate the contrast,but probably not enough. You can use lights to fill in the darkest shadows. Butremember, sunlight is very ‘blue’ to your camera. Your lights, even LEDs,although they are closer in color temperature, are still artificial. I like tomake the light outside look as natural as possible while still being good forvideo. Sometimes you’ve also got those pesky clouds that can hide the sun justwhen you’re shooting. It may not matter, but it’s another thing you need tokeep in mind.
Sound can be harder outside because of little features likewind. You can control the ambient sound more inside (remember that phrase,“Quiet on the set!”?). And you can usually get the microphone close to thespeaker … if you have a speaker. The best and safest bets are wireless lavalier(lapel) microphones, but good ones are still really expensive. Or a goodshotgun mic, but then you need a boom operator. Do not hurt yourself by leaving the microphone that came with yourcamera attached to the camera. Even that Canon XL2 I mentioned earlier had amic, and it was a big one, that basically was just there to make the cameralook more impressive.
My top 10 tips for practical video production
So that’s it. Practical video because we have to bepractical. Frequently, we have to rush because we don’t have the time in ourbudgets to get things done the way we should or want. But we can be practicaland still make great video. The more you do it, the better you’ll get at it.And it’s a lot of fun too.
10. Be a Boy Scout:Be prepared for anything. If you have cords and cables, have extras. My kitalso has lots of clips of different sizes to hold things together and you’llalmost always have things to hold together.
9. Scout yourlocations: When you set foot on or in wherever you’re shooting, make sureyou’ve had the opportunity to look at the location before the shoot. Sometimesit’s not possible and I cringe when I’ve got to do that, but I worked in newsfor years where we didn’t have an opportunity to look before we leapt, so Isort of got used to it. But when I get the chance, I always check out where I’mgoing to shoot. It makes your life way easier. Way easier.
8. Always carryspares: SD cards (or whatever your video camera and/or recorder uses),batteries, bulbs … just about anything you consume along the way. You don’twant to run out of memory space on your card just as you’re getting the bestvideography of the day, or if a bulb burns out, or your camera runs out ofbattery. Have spares. Lots of spares. Except for LED lights. There are nospares for those, but they’re not going to burn out.
7. Carry releaseforms: You need these. If someone gets in your shot, even if they work foryour company, you need to get them to sign a release form so they can’t comeback to you later for a big movie salary.
6. Set your equipmentup carefully: The more time you take (up to a point!) before you press therecord button, the better your shots will be. You should check lighting, sound,and the overall look of the bright and dark parts of the image. Check yoursound, check everything.
5. Always wearearphones: You should never record your video without wearing headphones,preferably from the monitor side of what is actually being recorded. And eventhis isn’t foolproof. I got burned once because even though I was wearing aheadset, there was something going on between the interface of the camera tothe headphones. I wound up with video that looked good, but was unusablebecause there was a crackly sound I couldn’t remove—and I was wearing myheadphones. It happens.
4. Sync your sound tothe video: Things happen between the microphone and the camera. Use aclapboard with the scene number, or at least have someone put their hands infront of the camera and clap them loudly when starting a scene. If your audiosomehow doesn’t sync up with the video, it’s easy to do. And when you’re usingan external recorder, as I frequently do, it’s really a piece of cake to syncthe external sound up with the sound you recorded in the camera.
3. Make a shot log:Always have someone write down the shots as you take them. If you shoot severaltakes of the same scene, you should be able to go directly to the one you likedbest. You can record time markers from the camera. You should!
2. Try differentangles: Photographers use different angles all the time. Why notvideographers? (That’s what you are!) Try an angle you haven’t tried before.Try something new with your camera. Use a filter. Underexpose or overexpose tosee what effect you can get in the camera itself.
1. Have fun: Youcan’t make good video unless you’re having fun. Be creative. Do something alittle different every day you shoot … but not before you’ve got the shots youknow you need!
Want more?
Check out these sessions at DevLearn 2015!
Pre-Conference Blended Courses
Video Production for Online Teaching and Engagement, with Ty Marbut
Scriptwriting and Audio Production for eLearning, with Jennifer De Vries and Steve Haskin
Pre-conference workshops
B.Y.O.L.: Creating Whiteboard Videos on a Budget, with Cory Casella
Concurrent sessions
B.Y.O.L.: Applying Video Curation and Interaction in Student-driven Bite-sized Learning,with Ruth Ellen Heaton
Micro-learning Video on a Shoestring, with Thomas Spiglanin
Interactive Video for eLearning Designers, with David Anderson
Video Within Reach: Mythbusting and Testing to Greatness, with Lee Rodrigues andSam Rogers

