You’ve heard that Adobe After Effects (AE) is really cool,powerful software you could use to enhance the eLearning video you’re workingon. You open it up for the first time. You take one look at the screen and whatlooks like a zillion panels that start swimming in front of your eyes. Youscream and close the program. You don’t open it again for a few years … orever.
You’re not alone! Sure, there’s a timeline at the bottom ofthe screen just like Premiere Pro, but then there are all those different panesinside the main window. If you’ve used Premiere Pro or Premiere Elements toedit your video, it looks both familiar and alien at the same time. Don’tworry. This tutorial will have you understanding in no time how After Effectsworks. You’ll be well on your way to getting a handle on the ins and outs ofthis incredibly powerful software that can quickly add all sorts of visualelements to your eLearning that you might have thought were out of reach. Let’sbegin.
Why you should use After Effects
The bar is rapidly moving up for eLearning video creation. Mostof us who create media for training need to expand our toolbox to embrace thechallenge. We need to create the very best work we can do … every time. AfterEffects is a program unlike any other image manipulation software on the market.Many others have tried to make something similar, including Apple. No companyhas been successful. There’s a reason why many Hollywood films use AfterEffects as a part of the post-production workflow. It works. And it’s an extremelypowerful software tool. (See the sidebar “Top 10 Things You Can Easily Do withAfter Effects to Give Your eLearning Video Punch.”)
This is what you see when you open AE (Figure 1). What lookslike a hodgepodge of panes is really a well-thought-out series of workflow stepsyou’ll use all the time when you’re working inside the program.
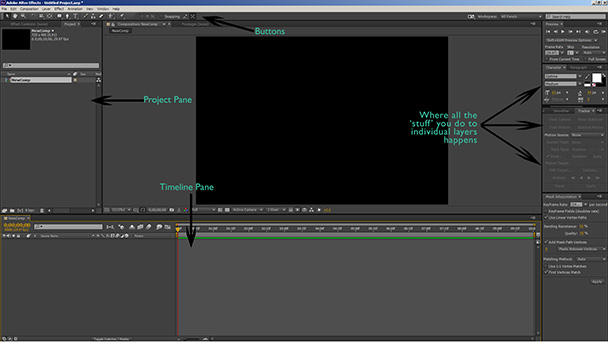 Figure 1: The After Effects workspace and all those panes
If you’re familiar with Photoshop, you’ll notice that whilethere are a lot of differences, there are also a lot of similarities, many ofthem buried. They’re not deep, but you need to find them. AE is in many wayslike Photoshop on steroids, so once you understand a few paradigms, you’ll beable to easily work in the program and start thinking about what you’re goingto do, which in turn will make you even more creative with the program. Let’sget started to make you fearless in After Effects.
Compositions, timelines, sequences, and projects
This might be the hardest thing to understand about thewhole of AE:
- AE has projects and compositions. Premiere Prohas projects and sequences.
- In Premiere Pro, a sequence timeline is infinite(in theory). It’s as long as whatever media you place on it. In AE, you createa composition with a time (duration) that you set (and you can always change itlater).
- In Premiere Pro, projects contain sequences. InAE, projects contain compositions. There is a paradigm shift between the twoprograms. A sequence has a timeline after you add media. A composition has aduration set when you begin the composition.
- In both Premiere Pro and After Effects, you haveto start the respective sequences and compositions inside the program.
Clear as mud? Let’s make a composition in After Effects andyou’ll see what I mean.
How to make a composition in After Effects
The easiest way to make a composition in AE is to get themedia you need to work with and import it to the Project pane. You do this by:
- Doubleclicking on a blank space inside the Project pane (refer to Figure 1) then navigateto the place where the files you need are. Click on those files and then clickOK. This is much like most other software. Then, in the project pane, take thefile you’ve going to use and drag it down to the “Create a New Composition”button (Figure 2).
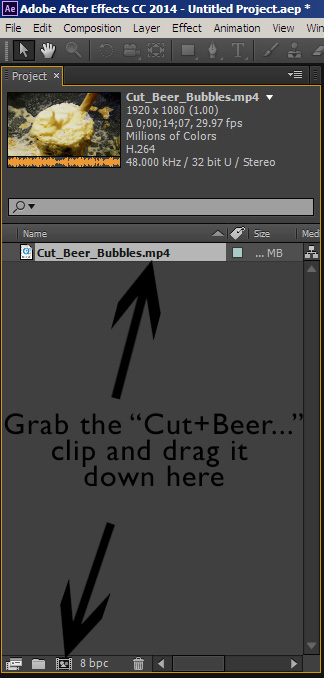
Figure 2: Dragging a file tothe “Create New Composition” button - When you release the file with your mouse, a newcomposition will instantiate using the file’s name, the dimensions of the video,and the duration of the clip. Here it’s sometimes easier (but not always) tohave your video clip cut to the duration you need … or you can dynamically linka sequence in Premiere Pro. In Figure 2, I’ve isolated the composition window.You can see there aren’t a lot of moving parts inside, and it is simple. The“Create a New Composition” button is enlarged. Or…
- Sometimes you’re making your own media; Forinstance, if you want to make a super with words or letters that move (see thetutorial here),you need to start your own composition. You can do this easily when you openthe program or by going to File >New>Composition and the Composition Settingspane will open (Figure 3). You can set the duration, size, etc. of thecomposition. Remember that a composition doesn’t have to adhere to anydimensions … you can make a wide and skinny composition for a super and simplywork with that size in your project.
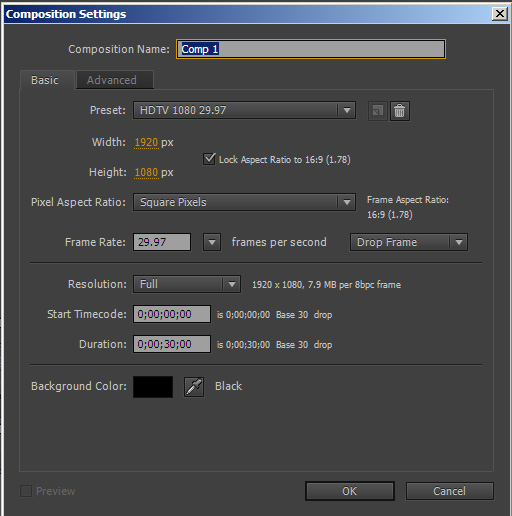
Figure 3: The CompositionSettings pane
Dynamic linking
One of the real powers of After Effects, besides being apowerful program itself, is dynamic linking. Dynamic linking allows you to “link”an AE composition to a Premiere Pro project and insert it into your videosequence just like regular footage.
It used to be that to put an AE composition inside aPremiere Pro project, you had to render it first in After Effects and thenimport it as regular footage into a Premiere Pro project. The render took time.If you had to change something in your AE composition, you had to go back toAE, make the changes, and reimport it into Premiere Pro. It was a completepain.
Check out a short video tutorial here.
Here’s another example of how dynamically linking acomposition to Premiere Pro works: Let’s say you’ve inserted a super and justfound out you spelled the name incorrectly. Either alt+tab to AE (if it’salready open) or open AE, navigate to the project, select the compositioninside the project, change it, and save the file. It already links to yourproject in Premiere Pro. You’re done! It doesn’t matter how complex thecomposition in After Effects is, it’s a dynamic link. So when the contents ofthe composition change, the changes appear instantly in Premiere Pro. No renderingneeded!!! Simple and easy.
One more thing
I haven’t even touched on this, but hiding inside AfterEffects is a hugely capable 3-D program. It’s called Maxon Cinema 4D. When youinstall AE, it’s included inside the program. This is a completely different pieceof software with a totally different engine. You can only access it from withinAE, and after you work on the 3-D part of your project the 3-D project dynamicallylinks inside your AE project. The software is very different. The workflow isvery different and it’s very complex, but not scary. I’m not going to cover ithere because it’s totally different software to learn, but it’s good to knowit’s there.
Sidebar: Top 10 Things You Can Easily Do with After Effects to Give Your eLearning Video Punch
- Titles and supers that move—we’re not justtalking about moving the letters either.
- Stabilize your shaky shots with the built inmotion tracker.
- Animate figures.
- Make animated figures look like they’re talking.
- Create animated infographics for your lessons oranimated any graphics at all!
- Integrate “green screen” shots with greatbackgrounds. (But please don’t overdo this!)
- Track motion so you can add objects that“attach” themselves to the motion… very similar to #2, but with somevariations.
- Dynamically link an AE composition to PremierePro so that you can make active changes to your document.
- Use a lot of the same filters you use inPhotoshop.
- Makereally cool whiteboard effects like you’re writing on a wall.
A how-to example—camera stabilization
This example will show you how to stabilize a shaky camerashot. If you’ve made video for a while, you’ll know the shot you want isn’talways steady since a lot of us can only do shoot-and-scoot … get the shot andgo to the next. In this tutorial, you will create a dynamic link that interactswith Premiere Pro and After Effects and you will gain an understanding of howAE works on a more subtle level. You’ll also learn how to nest an After Effectscomposition inside another AE composition.
Stabilizing a shot is not as hard as it looks, but there area few quirks. It’s somewhat more an art than a science and, as usual, there’sway more than one way to do this. This example calls for some creativity on yourpart. As you do the exercise, be aware that it can be an iterative process, butwe’ll also show that. Let’s begin.
- Open After Effects and Premiere Pro.
- Double click in the middle of the project paneand locate the file with the camera shake. Select that file and click OK.
NOTE: The file you select shouldneed stabilization, but it should also allow for some cropping. Thestabilization moves the image around in the window and, depending on the clip,some or a lot of it may go out of the screen after you’ve finished stabilizingthe image. - In the Project pane, click on and drag the filedown to the new composition icon at the bottom of the Project pane. The icon lookslike a frame of film with sprocket holes on the sides.
NOTE: Here is the video clip I used,if you want to practice on that. - As you drag the little video clip down to theicon, it will create a new composition the length and dimensions of the videoclip. There are easy ways to trim the clip here, but I’ve found that if you trimand export the clip from Premiere Pro before importing into AE, things go muchsmoother.
Now the fun begins: Look closely at your shot. Focus attentionon one little part that has high contrast (the difference between the lightestand darkest pixels or a larger part of what you want to search, perhapssomeone’s ear) and look at how that little spot moves around in the screen. Putthe timeline cursor back to zero and zoom in on the tiny spot using the scrollwheel on your mouse or trackball.
- If there’s a pan in the shot, where differentobjects go into and out of the shot, don’t use it to stabilize unless you canbreak the shot up. This is for after you’ve got some experience withstabilization. You might have to get creative and divide the shot into two oreven three parts and treat each one separately. For now, let’s say you’veselected a shot … or used the one included with this project.
- Go to the side panel that says “Tracker” andmake sure your video clip is active (click on it once) and you’ll see the Trackerbox light up. If the Tracker panel isn’t visible, then go the file menu, clickon Window > Tracker. The pane will become visible on the right side of thescreen.
- Click anywhere on your clip and the “StabilizeMotion” in the Tracker panel will light up. Now comes the artistic part…
- Move both boxes together (when the cursor isblack with the “cross arrows” next to it, that’s when you can move the wholething) to the part you want to use as the focus for your camera stabilization. Thenzoom in on the area you want to use as the attachment point for stabilization.I’ll mention this here again: High contrast makes tracking easier for thealgorithms in AE to do this so if you’ve got a little region that has a verybright and a very dark area, use this.
- Once you have sized the inner box to the featureyou want tracked, make the outer box larger (usually) or smaller to define the “SearchRegion” for the tracker.
- Nowclick on the right-pointing arrow in the Tracker panel. This is not a playbackbutton as it looks, but rather a “search from here” switch that moves forwardon the timeline. You can use the left-pointing arrow to search for trackingearlier in the shot. As the feature moves, the search region will move alongwith the feature. This IS NOT a foolproof method. Sometimes the search regiongets a little confused and you’ll notice a frame jump completely out of the range.I don’t know exactly why this happens, but it does. I think the algorithms willbecome more sophisticated as time goes on.
- Onceyou’re sure you’ve got it, click on the “Stabilize Motion” button and AfterEffects will track the motion … you’ll see the little box moving around. If thebox moves out of the region you’re using for position, change it around untilit stays in that region. Then click on track motion again. Eventually, it’llfigure it out and you’ll have stabilized motion.
- Whenyou’re happy with the way it all looks, click on “Apply,” and your shot isstabilized. Note that one of the things that stabilizing does is to move thevideo itself around in the frame.
You’ll have to adjust this part by hand to make surethe video stays framed. The easiest way to do this is to “zoom out” a littleand scrub the timeline to the point that the stabilized video is out of theframe, and then enlarge it enough to be inside the frame. You’ve zoomed insomewhat, but the shot now looks steady. Dynamically link the clip and…
That’s it. You can now make a composition in After Effects, stabilizeyour shot, and make it work with your eLearning video! You are a pro!!!