As job aids, supplementary information in eLearning courses,resources, and a way to share information securely and easily, PDFs areubiquitous and invaluable. Unfortunately, though, a vast number of them lackeven basic accessibility features. Creating accessible PDFs is simple, sothere’s no reason not to build usability into these versatile documents.
Some eLearning developers believe that PDFs are“automatically” accessible. This is not the case. However, an automated processbuilt into recent versions of Adobe Acrobat empowers developers to easily improveand verify PDF accessibility.
Characteristics of an accessible document
A keystone of online accessibility is enabling mobility aids and assistive technologies tointerpret content and convey it to learners. When the content is text orimages, the primary assistive device is screen-reading software—and what thesevirtual assistants crave more than anything else is structure.
Creating a logically structured document is the only way toensure accessibility. This accessibility goes far beyond usability with screenreaders—a well-structured document is more accessible to any learner,regardless of ability or familiarity with the topic. As is the case with manyaccessibility features, preparing a screen-reader-friendly document really justmeans creating a logical, well-designed document—a benefit to all learners,including those with visual disabilities.
A well-structured document:
- Has a logical reading order, with headings ofdifferent levels and body text tagged appropriately—using heading and bodystyles, rather than manually formatting heading text to create a visualhierarchy
- Includes alt text descriptions for images and charts
- Formats lists correctly—with HTML tagging or bulletsor numbers built into a list style rather than inserting numbers or bulletcharacters manually
- Includes readable, useful link text
- Bookmarks useful text passages and charts, inaddition to section headers, if the document is longer than a few pages
- Optimizes tables and form fields for usability
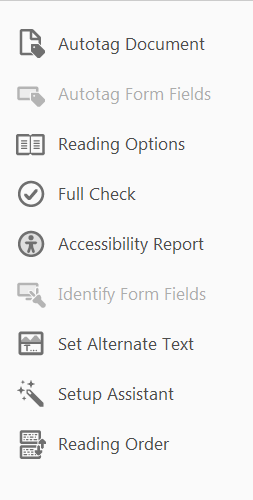
Heading and body styles, alt text, and list formatting useHTML tags. The body, heading, and list styles should be built into documenttemplates to ensure consistency and easy updating. Word, Adobe Acrobat, andmost authoring tools and social media tools include a place to add alt text,along with captions, in the dialog boxes that allow inserting and formatting photosand graphics. Alternatively, Adobe Acrobat’s Set Alternate Text option (part ofthe Accessibility menu) makes it easy to add alt text; it even offers acheckbox where you can decline to add alt text for a decorative image, such asa cover photo or graphic design flourish:

Figure 1:Setting alt text in Adobe Acrobat offers the option to mark an image as decorative;decorative figures do not need alt text descriptions
Creating usable links is a habit that all eLearningdesigners and developers, as well as anyone who writes online text, shouldcultivate.
These structure and design features should exist in allcontent, regardless of whether it will be converted to PDF.
Reading or “tab” order
An accessible document must have a logical reading order—thescreen reader needs to “know” how to read the text in a way that makes sense tothe learners. Tab order is also important; this is the order in which a learnerwill access sections of text or form fields when using the Tab key to navigatea screen of content. Many assistive devices use the tab order to navigate, evenif the learner cannot actually press the Tab key. When using tab navigation, somescreen readers may skip text, tabbing only between form fields and links.
When checking the accessibility of a PDF, you can check andchange the reading and tab order; you can also use the Reading Options tool inthe Adobe Acrobat Accessibility menu (Figure 2) to set Reading Order to “Taggedreading order,” which means that the reading and tab order will be the same. ReadingOrder is an option on the Accessibility tool menu. Clicking it opens the TouchUp Reading Order dialog box (Figure 3), where you view and change the readingorder.
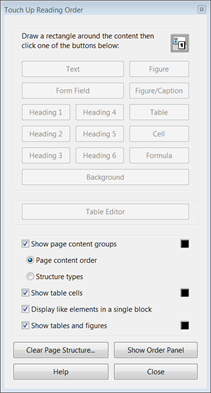
Figures 2 and 3:The Adobe Acrobat Accessibility menu options (left) and the Touch Up ReadingOrder dialog box (right)
You can toggle between seeing the order (Page content order)and the type (Structure types). The order—indicated by numbered boxes (Figure4)—tells you whether the flow is correct, and the type tells you whether each contentitem is tagged correctly.
- To change the order, click the Show Order Panelbutton and, in the pane that opens, drag items to reorder them.
- To correct tagging, select content—the cursorturns into crosshairs when you hover over a content element; draw a rectanglearound, say, a Level 1 heading—and click the appropriate button in the dialogbox.
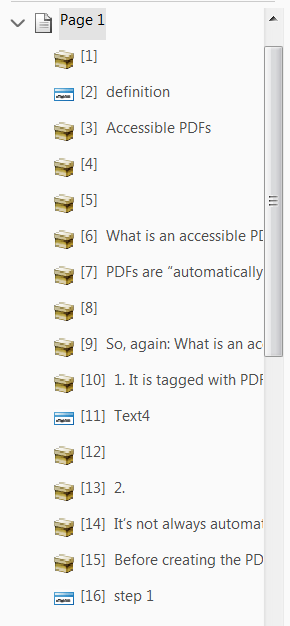
Figure 4: TheShow Order Panel lists the content items in the order that a screen readerwould read them. Developers can move them up or down.
You can test the reading order using the Read Out Loudoption on the View menu. Activate Read Out Loud, then read a page or an entiredocument.
Tags, tags, and more tags
The “Make Accessible” process in Adobe Acrobat adds PDF tagsto a document. Creating a properly structured Word or web document requiresusing HTML tags. PDF tags and HTML tags are similar but not interchangeable: Afile with correct HTML tags will not automatically become a properly tagged PDF.
Putting in the HTML tags is a great start and an importantstep in creating any web content. All of the tags—HTML and PDF—provideinformation to the screen reader about the document’s structure and the orderin which content is to be read. If the document is tagged correctly inWord—using heading, body, and list styles—much of the structure will transferto the PDF. HTML tags identify:
- Document title
- Each level of heading and subheading
- Body text
- Alt text descriptions of photos, charts,and other graphics
- Ordered (numbered) and unordered listsand list items
- Table elements
- Captions for photos, charts, and tables
If your document is based on a Word template with definedstyles, this tagging occurs invisibly. Unfortunately, later versions of Word(Word 2007 and later) no longer offer the options to “Save as a web page” orview the source code. However, if you experiment by formatting a Word documentwith styles and without, and use a screen reader with both, you will quicklyunderstand the difference!
Recent versions of MS Office (Word, PowerPoint, Excel) support an Adobe Acrobattoolbar that can create tagged PDFs directly from the Office application. Usingthe Create PDF and Run Action option allows you to run the Make Accessibleaction at the time you create the PDF.

Figure 5: TheAcrobat toolbar is available in the latest versions of Word and other MS Officeapplications
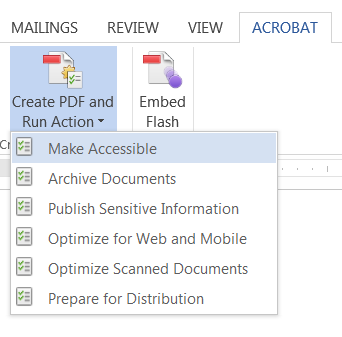
Figure 6: TheCreate PDF and Run Action button in the Acrobat toolbar allows developers tocreate tagged PDFs right in Word and other MS Office applications
If your version of Word (or other authoring program) doesnot support an Adobe Acrobat toolbar or PDF maker, you can simply run the MakeAccessible action in Acrobat.
Navigation is easier with PDF bookmarks
When a PDF is created, the PDF generator automaticallycreates a bookmark for each table of contents entry—usually Level 1 and Level 2headings. You can add or rename these (and all) bookmarks and set or changetheir destination—the place in the document that they mark.
In addition to bookmarking section headings, consider addingbookmarks for lists, processes, charts, or instructions that learners might referto frequently. The bookmarks, especially if you give them clear, easilyunderstood text descriptions, are useful navigation aids for all learners.
![]() To view and revise bookmarks, open the Bookmark menu (click the Bookmark icon).You can bookmark:
To view and revise bookmarks, open the Bookmark menu (click the Bookmark icon).You can bookmark:
- Text—select with the selection arrow
- Images—select the entire image or draw arectangle around part of it
![]() Withthe text or image selected—this is the bookmark’s destination—click the AddBookmark icon to add a new bookmark.
Withthe text or image selected—this is the bookmark’s destination—click the AddBookmark icon to add a new bookmark.
The new bookmark appears in the list under an existingbookmark, such as the section heading, or at the end of the bookmarks list.
Table talk
Tables are a great way to present data and show logicalrelationships—unless the learner can’t see them. Without the visual hierarchyand associations and visual cues that differentiate row or column headers anddata, it can be impossible to understand the data in a table and therelationships between different pieces of data. Improperly formatted tables area nightmare for screen readers and anyone who relies on them. HTML markup fortables includes:
- <table>—Definesa table
- <th>Table header—marks a cell as a header
- <tr>Table row—defines a row in the table
- <td>Table data—marks a cell as data
- <scope>plus <row> or <col>—Indicates whether a<th> cell is a row header or a column header
- <caption>—Indicatesthat the brief descriptive text that often appears right before or after thetable describes the contents of the table; the caption should immediatelyfollow the <table> tag
Additional tags are needed for tables with complexformatting, cells that span more than one row or column, etc. Not all assistivetechnologies support this complex formatting, so it is preferable to createsimpler tables that are more easily rendered accessible.
It’s possible to add tags to tables in Adobe Acrobat, butthe process is smoother if you tag the document in Word or the originalauthoring tool. Acrobat’s Touch Up Reading Order tool, described earlier, can assistyou in correcting tags and improving screen reader accessibility. You can usethis tool to fix any errors in table tagging or add missing tags. During this process, youcan also add a table summary, which is a description of the table structure thatsome screen readers and other assistive technologies can use; but, again,simplifying the table makes this attribute unnecessary—and improvesaccessibility for all learners, not only those using screen readers.
Form fields need tooltips
A great feature of PDFs is their support for fillable forms.It’s easy to add form fields to a PDF or create a new PDF form within Acrobat,and even to convert a scanned paper form or a non-fillable Word form into aform that learners can fill out and submit using Acrobat Reader. These formsneed some tweaking to be accessible, though.
Choose Prepare Form from Acrobat’s Tools menu. If a documentyou open or scan already has form fields, Acrobat will add the fillable fieldsautomatically. Check to be sure that all the needed form fields are there,though—and add any additional forms using the toolbar.
For accessibility, each form field—and each button—needs anHTML <label> that tells the screen reader the purpose of the field. (Note:The label is called a “name” in the WCAG 2.0 standard and an “accessible name”in WAI-ARIA.)
- Use Acrobat’s tooltips to add labels. You canadd tooltips in the Form Field Properties dialog, which you open by right-clickingon the form field or clicking on All Properties at the time you add the field.
- You can leave the dialog box open and click oneach field in a document to check, revise, or add tooltips.
- The tooltip must include all of the informationthat the learner needs to know to correctly complete the field, such as:
- Whether the field is required
- What information the learner should enter
- Example: “Last Name (required)”
- For buttons, the tooltip can be identical to thetext on the button itself, e.g., Enter or Submit; the tooltip should tell thelearner (via the screen reader) what the button does.
Not all types of form fields are equally accessible. Thebest choices for an accessible form are:
- Textboxes. Most screen readers will read the “default” text—whatever appears inthe form as a placeholder—but do not count on this. Leaving the placeholdertext blank is less confusing to many learners.
- Drop-downlists. These are navigated using arrow keys or by typing the first letterof an option. Screen readers will generally read the default option. Eachoption needs its own tooltip.
- Checkboxes.The tooltip for each checkbox in a group must include both a description of thegroup—what is the question that the learner must answer?—and the individualoption choice the box represents.
Other types of form fields, such as list boxes and radiobuttons, are more challenging for screen readers to navigate accurately. Avoidthese in accessible forms.
Once all of the needed fields are in the document andcorrectly labeled, the next step is tagging them. Tagging ensures that thescreen reader identifies the form fields and reads them in the correct order.Use the Autotag Form Fields option in the Accessibility menu to do this.
Check the reading order once you’ve done this; you can “touchup” the reading order at any time, but checking it as you add layers ofcomplexity can ensure that new elements stay where they belong.
A final check: Is this PDF accessible?
Congratulations; if you’ve gone through all of the steps toensure that your document is logically structured, you are well on the way toan accessible PDF. A few additional issues can hang up screen readers, though,so don’t skip these steps:
- Ensure that the document title shows in theAcrobat title bar; check Acrobat’s File: Properties dialog box. Fill in thetitle if that attribute is empty.
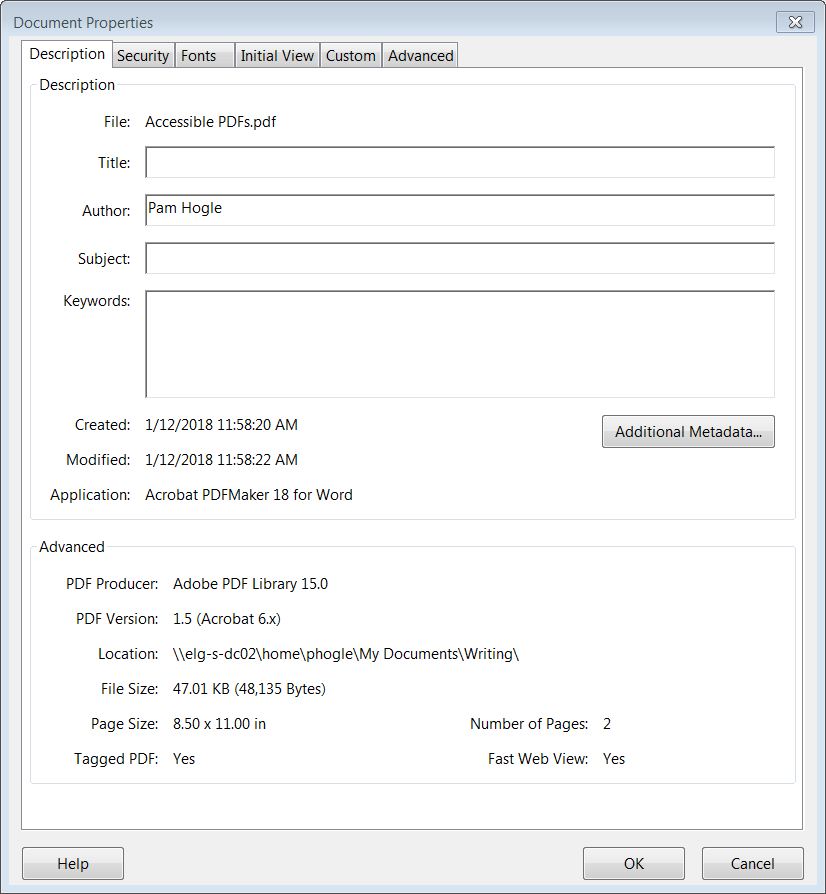
Figure 7: Make sure a title appears in the Document Properties:Title field
- Set a document language in Word or your otherauthoring tool. You can also choose a language in Acrobat’s File: Propertiesdialog box, on the Advanced tab.
- Disable document security settings that preventcopying, printing, or extracting text. Some screen readers are able to overridethese settings—but Adobe does not provide a list, and learners can be using avariety of assistive devices, so it’s best to disable these settings inaccessible documents.
- Use OCR software to convert images of text, suchas scanned documents, into readable text.
- If the document uses colors, part of theaccessibility check verifies that there is sufficient contrast that the colorsare accessible to learners who have color-blindness.
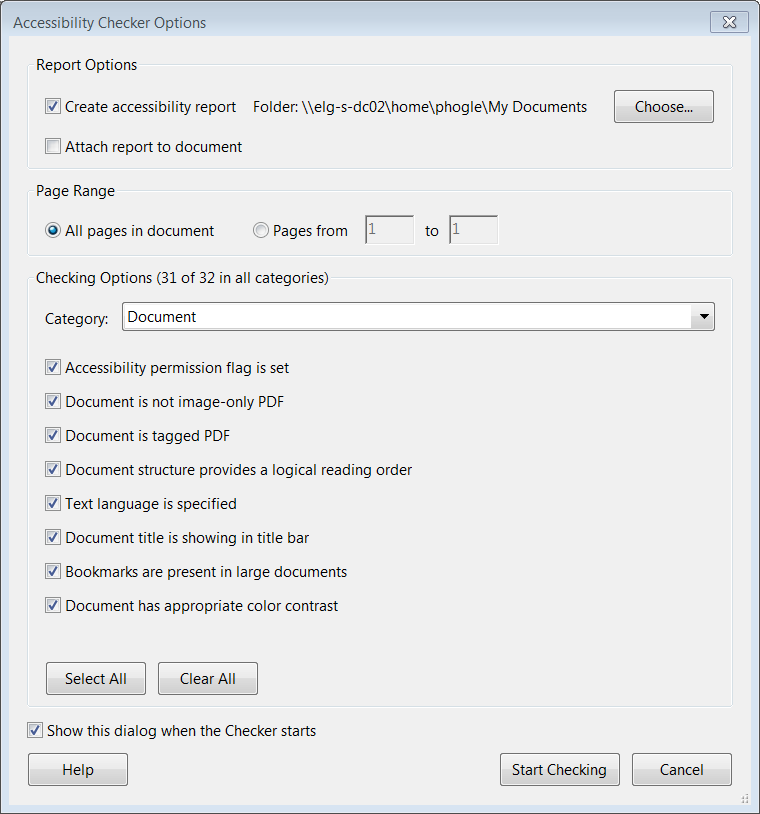
Figure 8: TheFull Check is the final step in verifying that a PDF is truly accessible
The last step is a final accessibility check. Run the “FullCheck” and request a report. The check will catch anything you missed—an imagewithout alt text or a missing label, for example.
If your document creation process does not include steps to build instructure and accessibility, it might seem like a lot of effort. The resultinglogical, well-structured documents will benefit all learners, though, and areeasier to update and maintain because the formatting is consistent andintegrated with the content. These steps quickly become an integral part of thedocument creation and revision cycle, and are habits worth developing. Creatingaccessible PDFs is an easy way to improve content and make it usable for alllearners.