What do you do when you have to shoot on location and your actor can’t be there? What if the “location” where the action will happen only exists in your mind? How can you superimpose an actor onto a still photo or a video as a background?
The classic answer to these questions is “chromakey,” otherwise known as “green screen” (or “blue screen”—different name and color but the same principles are involved). This is how your television weatherman appears in front of a big weather map or radar display. Sounds simple, doesn’t it? Put your actor in front of a green background (the “green screen”), then just use video technology to capture an image of your actor (without any of the green background). After that, use video technology to put that actor’s image on top of the background you want.
But it isn’t that simple. Green screen is a technique that requires careful planning and setup, careful lighting, a certain amount of the right equipment, and a lot of know-how and tweaking. Don’t believe me? Google “green screen techniques for video and photography.”
There is a simpler way. You don’t need all that equipment, and software can take care of almost all the rest. In this article, I will offer you a working review of Adobe Presenter Video Express, the latest software solution for the kinds of problems I mentioned in the first paragraph.
Adobe Presenter Video Express
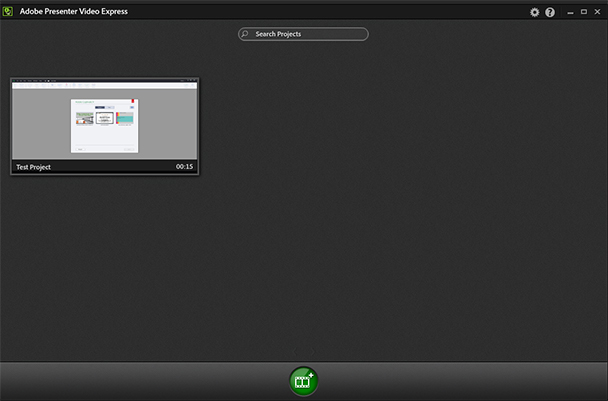
Here’s the opening screen for Adobe Presenter Video Express (Figure 1).

Figure 1: Presenter Video Express opening screen
Now, that’s pretty basic. A little box inside a big box and one big green button at the bottom center of the screen.
You might imagine that this is a simple piece of software; however, this isn’t the whole story. In this case the power is under the hood, so to speak. From this screen you can either continue working on a past project (the smaller box in the upper left of the bigger box) or you can start a new project by using the big green button.
I’ve looked at a lot of “new” video- and audio-related software. They're mostly a rehash of what I've seen or used. Most offer little in the way of new features.
Features
But I cannot ignore Adobe Presenter Video Express. This is one program I’ve seen in the last several months that totally exceeded my expectations, and continues to do so. It’s a standalone version of the video part of Adobe Presenter that allows you to capture directly into PowerPoint from your laptop video camera. But that was about all it did when it was part of Adobe Presenter. There was no way to change what was behind your head. Presenter Video Express is an amazing new program on several levels, both in concept and in execution.
The first (and most important) thing Presenter Video Express (PVX) does is to eliminate the need for green screen production. You can do the same things with PVX that you can do with a regular green screen setup, but without all the fussiness.
In eLearning, we never seem to have enough time or budget for video production. As I mentioned earlier, green screen, even in a studio, is not the easiest thing to use. You need some expertise to use it, mostly in lighting, but it also requires good post-production skills. Not so with PVX. All you need is a blank wall and a webcam. That’s it. You can make “green screen” video anywhere.
Adobe’s engineers wrote a brilliant algorithm that will make your work look like network TV. It doesn’t matter whether you are in front of a blank wall or plain fabric, or even a mostly blank office wall, no matter the color of the wall or fabric, PVX can extract you. All you have to do is click on the bottom of the screen where it says “Make my background awesome” and it takes a snapshot. Then use your mouse to draw a line from the top of your head to the bottom of the screen and a second line across your shoulders. PVX captures you and leaves the rest. After that, you can put whatever you want in the background, including a still image, a video, or a motion graphic. The process is just that simple, and it’s very fast.
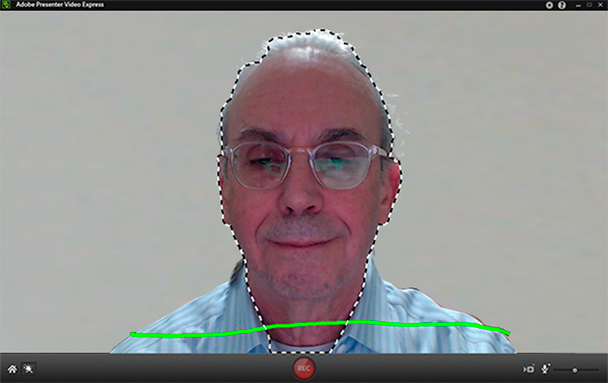
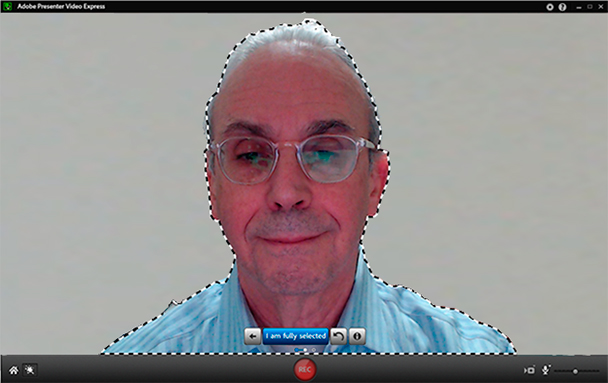
In Figure 2, I’ve already drawn a vertical line with my mouse from the top of my head to the bottom of the screen. The dashed line (marquee or mouse tracks) appeared around my head, partially selecting my face and neck as soon as I let go of the mouse. At this point, I used the mouse to draw the horizontal line across my shoulders that you see in Figure 2. In Figure 3, PVX immediately completed capturing everything from my shoulders to the top of my head. (Note: I had to capture the screen while my hand was still on the mouse holding down the left hand button. Not an easy task … think mouse on floor and foot holding down button! But it does explain my expression!)

Figure 2: Presenter Video Express (PVX) with my head selected and the horizontal line visible. This line captured my shoulders. I drew the line and let go of the mouse to capture my whole torso.

Figure 3: Two lines, and selection is complete!
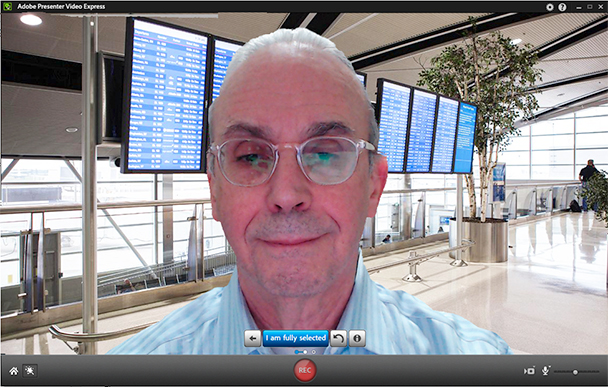
In Figure 4, I’ve dropped a still photo behind the image of myself. Because the light on my face in the extracted image pretty closely matches the direction and color of the light in the still photo, the result looks a lot like I was there.

Figure 4:This is the final result after dropping a still photo in behind the extracted image.
This selection is a bit of prestidigitation that uses a very complex new algorithm. The program first takes a still image from my camera. Then it uses that image to “extract” me from the background. Then it effectively allows me to record my video (in this case it would be a talking head, but it doesn’t have to be) while I’m doing standard human movements and motions. And it keeps me separated from the background the entire time I’m recording.
One of the things I’ve learned to do with PVX while I’m doing the initial recording is to drop in an image from the Adobe library included with the software. Or better yet, I’ve discovered if I put in a black image I made in Photoshop (saved as a JPG or PNG) and use that as a temporary background, then, at my leisure, I can drop in the file I want to use, which is usually a video. The program doesn’t care if you put a video, a motion graphic (which is video!), or a still image behind the presenter’s image.
Let me explain that a different way. I find stills a bit too boring. We need motion in our images to keep our eyes active, so I’m more inclined to drop video in behind the presenter. But if the video isn’t shot yet, I drop in that black still image as a backdrop for now and change it to video later. After you’ve recorded your video with the black background, you can go right ahead and use the video in Premiere Pro (or other video editing program) or in After Effects and use the black background as an alpha channel, effectively creating your green screen without ever seeing a big green screen behind the image.
I’m still figuring out all the different ways I can use Presenter Video Express to create unusual effects that really grab the eyes of our learning audience.
Making your background is just the beginning of what PVX can do as a stand-alone program. Do you want to add some interactive questions during your video? Easily done! How about publishing the project from PVX as a canvas document (see sidebar) or import it into Captivate or Presenter inside PowerPoint? You can do that too! It’s a versatile program for eLearning and I believe it’s going to become an actively used program in video production everywhere. The best part is you can learn how to use it in 15 to 20 minutes. Really.
|
What is Canvas? I’ve mentioned it in this article and it deserves a little explanation. Canvas is an HTML tag. Think of tags as “commands” to tell the browser how to display things. In this case the canvas tag was added to HTML5, which is just a new standard in HTML, not a different program. Canvas allows you to do all sorts of things on a web page without a plugin like Flash was. There are several advantages to this, and some disadvantages. The main disadvantage is you can’t just drop the media onto a page for your training or site. There are several parts to a canvas: the media file itself, a JavaScript file that tells the browser all about the media file you want to show on the page, and a CSS file that tells the browser how to display what you’ve also explained in the JavaScript file. If we all had to code these things ourselves, we’d be spending lots more time coding than creating content. The new programs create all three files for your web site. |
Making better productions
So why all the excitement on my part? I’ve been doing green (and blue) screen productions for a lot of years. The green screen background has to be very carefully lit, and the actors on camera have to have lighting that matches the scene behind them. Example: if you’re using a sunset for a background and you have actors in front of a green screen, light them strongly from the left (on a map, left is west).
How well does Presenter Video Express work? Fantastically, as long as you can sit in front of a plain wall. The wall can be almost any color. The better the lighting, the better the result. But the lighting doesn’t have to be fussy. That said, I once extracted my image at a conference in a hotel with miserable sodium discharge lamps overhead and a mottled wall behind me and almost NO separation between me and the wall. PVX gave me pretty good background extraction. Not perfect, but amazingly good, given the circumstances. The green screen alternative is more difficult and requires more equipment.
You can make improvements in your setup. For example, you can use a better camera instead of the one in your laptop (for now, that camera would have to be connected to the computer through USB) or set up the camera so that you can include your whole body (or your actor’s whole body). Adobe includes some still backgrounds you can use, but why? Use what you need, either still or moving. For example, use a video background for cases where you couldn’t do a live shoot. Use anything else you can imagine, including an After Effects composition or a Premiere Pro project.
PVX is so easy to use, it almost defies imagination. I’m pretty good with the Adobe video products, but I get paid by the hour and the more I can deliver to my clients in as short a time as possible, the more they like me and the more likely they are to hire me for another project. It’s all about time and value. At the end of the day, what matters is the value we can deliver (even in internal organizations) and not how glitzy the product is. If you can make it look wonderful, even better!
Adobe offers a fully functional 30-day trial (you can even save the files). Even if you’re an accomplished videographer, producer, director, editor, or whatever in the video sphere, PVX has value.


