


As many of you know, I’m a huge advocate of making eLearning challenging and engaging. I can hear you now, “Yeah, Joe, but who isn’t?” Well, we may all want to create great learning but the truth is that most learning is linear, passive, and boring. For the last several of the 32 years that I’ve been creating eLearning, my main career mission has been to show and teach how to design and develop eLearning that is scenario-based, that makes the learner think, that allows experts not to waste their time slogging through a lot of material they already know, but that also allows novices to get plenty of extra help. There are more elements, of course (media, social learning, and others) that help a lot, but we start with scenarios and build upon them.
Scenario-based learning, simply put, allows the learner to make mistakes and learn from those mistakes, not typically with immediate feedback (though that may be preferable sometimes), but with delayed feedback. What if the learner makes a mistake in performing the series of steps in a surgical procedure. In real life, that may not be evident until several minutes, hours, or even days later. Scenario-based learning gives us the ability to have potential surgeons and everyone else learn from their mistakes in a safe environment, one in which real patients don’t actually die as a result (and that’s a good thing).
In the past, whenever I’ve created such a lesson, I’ve used flowcharting applications to lay out the scenes and their branches, which made it much easier to then develop the slides or pages and the navigation between them in Adobe Captivate, Articulate Storyline, or Trivantis Lectora. See Figure 1 for a complete scenario I built for first-responder flood training and Figure 2 for a close-up of a section of it. Notice how after I created the flowchart I assigned numbers to each scene, which translated into slides in Captivate and Storyline and into pages in Lectora.
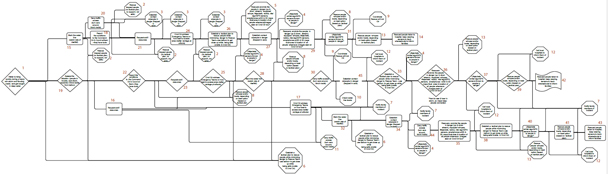
Figure 1: The complete flowchart for first-responder flood training
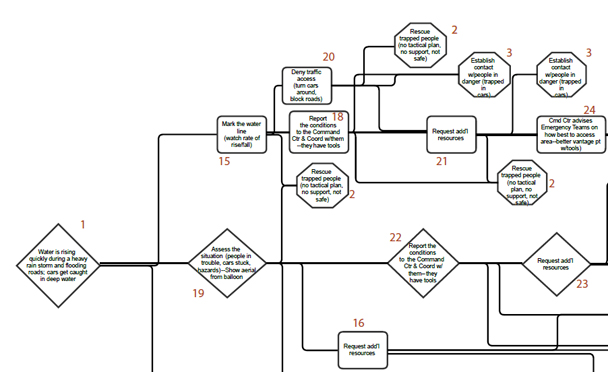
Figure 2: A section of the flowchart
Enter BranchTrack
While this approach has certainly worked for me in the past, I’m very happy to have found BranchTrack, a cloud-based tool that makes not just the flowcharting easy but actually outputs a full-fledged simulation for you. You can even take the result and insert it into a slide of your favorite authoring tool. In other words, it’s built to play well with other tools.
BranchTrack is simple. Start by setting up your first scene. See Figure 3.
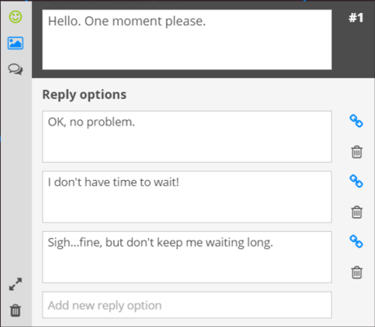
Figure 3: Editing a scene
Add a built-in character or an image of your own to display as part of the scene. Set the character’s emotion as well. Finally, you can add a background image too, again from built-in background images or one that you upload (Figure 4).
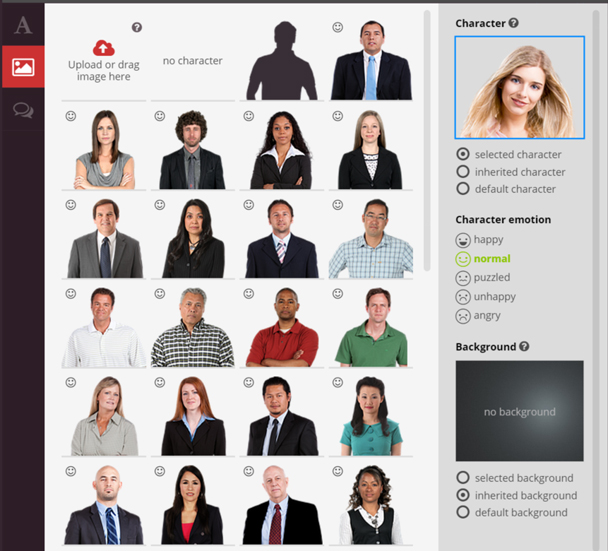
Figure 4: Adding characters and backgrounds
Once you’re set up your responses, you can link them to other scenes, by clicking and dragging the link symbols you see in Figure 4 to any other existing scene or to a blank part of the canvas to create a new scene. As you being to work, you’ll see your scenes and links forming, as Figure 5 shows.

Figure 5: The start of a scenario with scenes and links
Notice that Scene #7 has a symbol. Roll over it and it will prompt you as to what’s missing. See Figure 6.
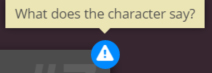
Figure 6: Helpful prompts
Back in Figure 3, note the ![]() symbol. This lets you enter the Full Screen
editor, where you can add the score for the scene, change the text color, set
or change links, and more. See Figure 7. Notice the Feedback option. It can be
a bit confusing at first glance because it is not shown as a result of the
learner choosing one of the options in the current scene. In fact, it is shown
prior to the learner making a choice. It actually serves as feedback to the
choice the learner made in the last scene, which then linked to the current
scene. In other words, I normally wouldn’t have feedback on Scene 1 but may for
subsequent scenes.
symbol. This lets you enter the Full Screen
editor, where you can add the score for the scene, change the text color, set
or change links, and more. See Figure 7. Notice the Feedback option. It can be
a bit confusing at first glance because it is not shown as a result of the
learner choosing one of the options in the current scene. In fact, it is shown
prior to the learner making a choice. It actually serves as feedback to the
choice the learner made in the last scene, which then linked to the current
scene. In other words, I normally wouldn’t have feedback on Scene 1 but may for
subsequent scenes.
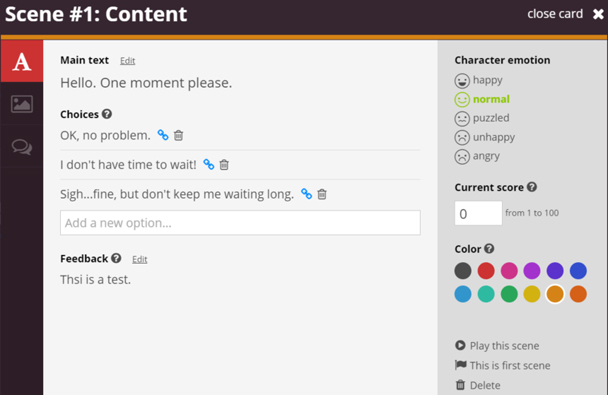
Figure 7: The full-screen editor
In the editor (full screen or regular), you’ll also see the ![]() symbol. This lets you add comments to the
current scene for yourself or for other developers who may be working in the
lesson. More importantly, the comments can be set by reviewers. A convenient
option in BranchTrack is the Review & Comment window, which lets you invite
any number of reviewers you wish and will show you their comments. See Figure 8,
which shows a symbol for Scene 1, indicating there is a discussion for that
scene. Figure 9 shows the comment, along with additional options.
symbol. This lets you add comments to the
current scene for yourself or for other developers who may be working in the
lesson. More importantly, the comments can be set by reviewers. A convenient
option in BranchTrack is the Review & Comment window, which lets you invite
any number of reviewers you wish and will show you their comments. See Figure 8,
which shows a symbol for Scene 1, indicating there is a discussion for that
scene. Figure 9 shows the comment, along with additional options.
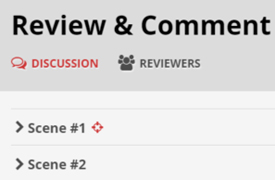
Figure 8: The Review & Comment section
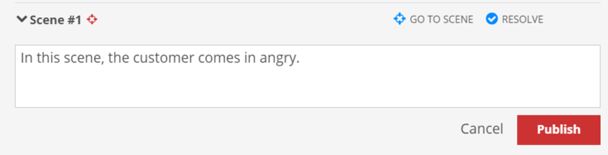
Figure 9: Comments for a scene
You can add audio voiceover to any scene and to its individual responses (video options are coming later this year). One really nice feature is the ability to automatically generate a script in BranchTrack, with relevant information, including what to name each file. By following the filename suggestions in the script, all of the audio files can be brought into the BranchTrack scenes in one fell swoop. See Figure 10.
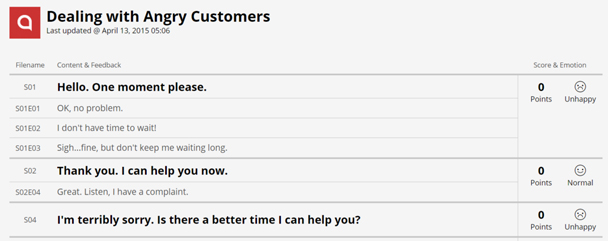
Figure 10: A generated script
Remember how I wrote above that you can set the emotion in a scene. This can be displayed to the learner if you wish, using an emotion meter, as seen in Figure 11. This may help learners gauge how well or how poorly they are doing.

Figure 11: An Emotion Meter
There are several other options in BranchTrack worth mentioning:
- There is a whole section to Brand your simulation so that it can match the rest of your learning.
- If you use Captivate, Lectora, or Storyline, BranchTrack will communicate with your lesson via JavaScript, if you wish, so that it can pass the score for a scenario back to your authoring tool. Furthermore, in Captivate version 8, you can set up a listener function which will be triggered every time the learner does something in BranchTrack. You can then use that to decide what to do next in Captivate. That’s pretty powerful!
- Some nice touches are found here and there in BranchTrack. For instance, when I switch out a character for a different one, the speech bubble I had on the first character will automatically move so that it’s positioned correctly for the new character.
- You can zoom in and out of the editor very easily, a must for this kind of environment.
When you are ready to Deliver your project, you have several options. See Figure 12.
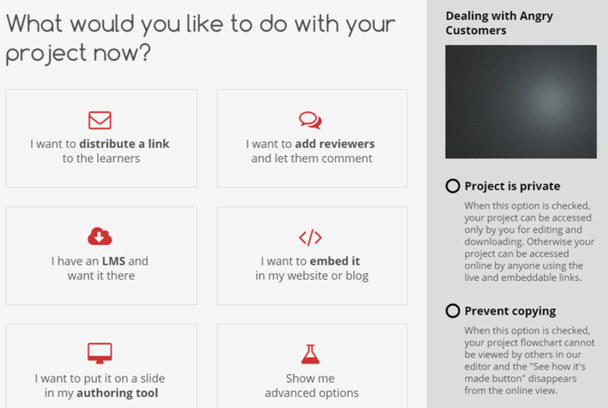
Figure 12: Delivery options
Note that BranchTrack works within your environment, delivering to HTML5. The HTML5 output is built for responsive design, meaning it will automatically adjust itself to different resolutions on mobile devices and desktops, not just by shrinking the image but by arranging it in the best way possible. If your learners are using older browsers like Internet Explorer 8, a tiny bit of Flash is included to enable media playback.
What else I’d like to see
Some more elements will be coming later. I’ve indicated that video will be coming this year. In addition:
- Scoring is currently limited to numbers between 1 and 100. I’d like to see the ability to have a negative score applied, or a raw score of any value.
- Scoring is also set up so that the last score always counts. This is logical in most instances but in some cases I’d like to have more flexibility there.
- There is no way at the moment to set up conditional actions, so that for instance I can determine whether a learner has already seen Scene 25 and if so, go to a different scene.
- I’m told that Analytics will be coming at a later time and I urge the company to implement that sooner than later. When delivering simulations, it’s important to have a robust analytics engine that can give us information regarding learner choices with as much detail as possible.
What do I think?
I really do like this product. It’s simple and not overly complicated, but packs some nice features under the hood. For more powerful simulations, ones that use a lot of conditional options and variables, BranchTrack probably won’t be enough, but for most of the simulations that I build, it is a quick and nice product to use. Yes, it’s important that they add video and analytics and that scoring is made more flexible. As I use it more and more, I may find other limitations I’d like to see overcome, but I’m finding this tool is helping me create my scenarios more quickly than I could before and the fact that it communicates with the authoring tools I normally use makes it easy to incorporate the scenarios I deliver from BranchTrack. I think it was very smart for the company to have built in that functionality to let it play well with other tools. I wish more tool vendors would follow that route!