
After 34 years in this business, you might say I’ve learneda thing or two about what constitutes good eLearning, even truly effectiveeLearning. What does it mean for eLearning to be effective?
It means that it prepares learners to handle problems andconflicts in the real world. It means helping people make the proper real-worlddecisions in situations that are sometimes stressful. It doesn’t bore those whoalready know the subject matter well, but it helps novices practice as much asthey need to become more expert. It certainly is not a one-size-fits-allapproach. It is a joy for learners!
A joy for learners?Joe, you must be kidding. I’ve never once seen an eLearning course that’s a joyto use. True, perhaps we can’t expect a joyful experience, but we can hopefor eLearning that engages us, not just with pretty pictures and sounds, butwith challenges, with respectful prodding, and consequences for actions that wetake.
I notice something interesting about my boys when they play videogames. In many games, there are occasional video sequences that last four orfive minutes, with beautiful imagery, music, and action. My boys don’t havemuch patience for those. Why? Because they aren’t actually playing the gameduring those sections. They are simply watching. Beautiful scenes don’t engagethem for very long.
So it is with most eLearning. We are told to watch, to read,to look at images, or maybe some videos. We are told to hit the “Next” button.We are given a quiz at the end to prove we learned something in the last fewminutes (never mind that we’ll forget it soon afterward). We all hate that kindof learning, yet we all have created that kind of learning. You know what? It …just … doesn’t … work!
What works? Scenarios work. I don’t mean multimillion dollar Avatar-types of environments. In fact,simulated scenarios can be simple text, just like those Choose Your OwnAdventure books or the old text-only Dungeons and Dragons games in the earlydays of microcomputers. How did those work? They sparked the imagination, theypainted a rich tapestry in the mind, and most importantly, they allowed the userto make decisions that would change the outcome. Of course, images, audio, andvideo help a lot, animations may as well, but they are not necessarily alwaysessential. What is essential is a challenge that leads to consequences, bothgood and bad.
Soft skills, such as customer relations, lend themselves toscenarios, but so can software training. After all, why are we learning thesoftware? To solve problems. What if we use the software incorrectly? We get badconsequences. Ask, “Why learn the software,” before you ask how to use it.
Many authoring tools today do not lend themselves well tocreating scenario-based learning. They push you toward a linear presentation.The truth is, the most important element you need to create scenarios is theability to navigate freely to anywhere from anywhere. You can do that in almostany tool, including PowerPoint, but some tools lend you the power to createthese navigable case-based scenarios much more easily than others.
SimWriter
Enter SimWriter,one of a few tools that can help in this regard. It does the job admirably, withalmost all the options to create the simulations you need. I’m happy to reviewit this month.
When you start SimWriter, you can build a scenario invarious ways: from scratch, from a PowerPoint file, by capturing screen shots,or through a wizard. This last is always a good idea when you first use a tool.Figure 1 shows you the different steps the wizard helps you complete, includingchoosing from a library of environments. (Of course, you can also use environmentsthat you build instead.)

Figure 1: SimWriter’s wizard
Once you’ve filled out the steps in the wizard, you movedirectly to the main interface, where you see a branching view on the left,called the Map, and the Design Stage on the right (Figure 2).
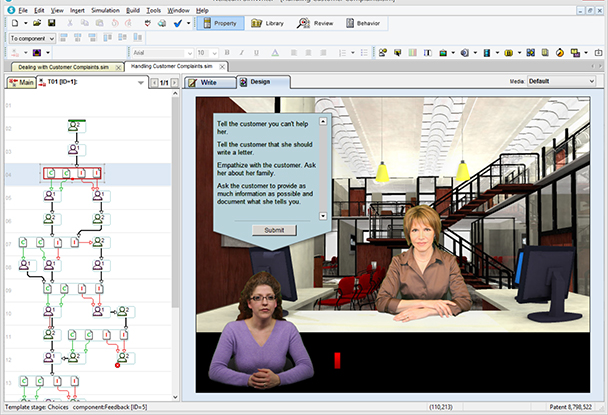
Figure 2: SimWriter’s interface
As you present the scenario and provide choices to thelearner, the branching will reflect what you’ve done, showing which branchesare correct, incorrect, etc. based on the scoring system you choose, as seen inFigure 3. In the Map in Figure 2, you can see these reflected in the letters (C= Correct, I = Incorrect).
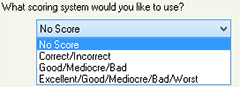
Figure 3: SimWriter’s scoring system
A Property windowis available that lets you change many aspects of whatever you’ve chosen at thetime. For instance, you can change one of the branches in the Map fromIncorrect to Correct by changing its property. See Figure 4.

Figure 4: Changing properties in a template
You can type or add other elements directly to the Designstage, but SimWriter also has a separate Writetab that gives you more choices and easier editing, as seen in Figure 5.
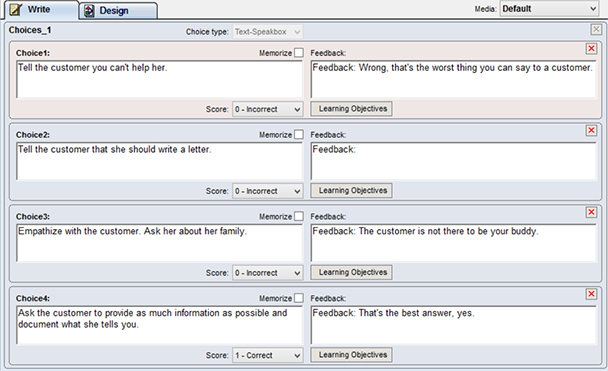
Figure 5: The Write dialog
Notice the Memorize checkbox next to each choice in theWrite tab above. This allows for SimWriter to remember the learner’s choice sothat you can refer to it later. You can show it and make decisions based ontheir choices too.
Now that I’ve explained thebasics, let me point out the options you have for inserting other elements. Asyou can see in Figure 6, there are a number of different interactive,multimedia, and static elements that you can include, such as hyperlinks andtimers.
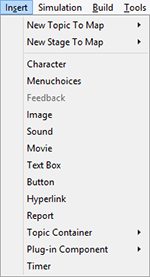
Figure 6: Insertion options
Advanced branching and behaviors
You can see that you can do a lot with SimWriter without theneed to be a programmer or scripter. While SimWriter is not a programminglanguage, it includes some advanced techniques that make power users like mehappy. In Figure 7, you can see where I created a script that I’ve attached toa button so that if the learner has reached a level of progress, I will show thelearner a Character and load a thank you image, otherwise I will branch thelearner to the main topic.

Figure 7: A Behavior script
Publishing
SimWriter publishes to HTML5, to Flash, or to both, so youshould be able to accommodate all of your learners, whether they have olderbrowsers or not, as well as those using mobile devices. If for some reason youneed your learners to have an app version of your lesson, you can create onefor iPhones and iPads. See Figure 8.
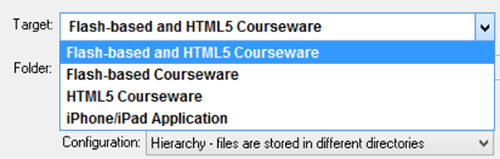
Figure 8: Publishing options
More features I really like
- You can have as many simulation files open asyou like. You don’t have to close one to open another. This makes copyingbetween simulations easy.
- A Timer component lets you put the onus on thelearner to make a decision within a specific amount of time.
- Advanced branching gives you a lot of power overthe path the learner takes through a simulation. For instance, if a learner’sperformance is not up to snuff, you can take them down a separate path forfurther remediation.
- The Media Manager lets you link audio and videofiles in one dialog so that you don’t need to do that on each stage.
- You can export scripts to a Word doc, a textfile, or to an HTML file for narrators or reviewers. Each script is identifiedby the actor and is tagged with how they should deliver the narration (openly,defensively, sadly, etc.).
- When you copy a stage from one simulation toanother, a Paste Special option lets you also bring over its associatedtemplate and other factors.
Needed improvements
- Every element on the screen comes up basicallyat the same time. There’s no easy way to have screen elements build. You canget around this a bit by splitting your content into different stages and usingthe Timer component to jump between them. That way, you can show a machinebeing built from the inside out, for example.
- The PowerPoint importer is limited. You canimport each slide as a graphic or as a graphic with text you can edit, but thetext is placed in its own field stripped of its attributes, such as font andsize.
- It would be nice if you could zoom in and out ofthe Map and in and out of the Stage.
- Responsive design in published files is going tobe a must in the near future: that should be built into the next version ifpossible.
- It would be great if you could save a stage you’vecreated as a template so you can more easily reuse it later.
- When you copy interactive elements, such asbuttons, from one stage to another, the attached behavior currently doesn’tfollow it—you have to copy and paste it separately.
- If you create a behavior script for an object,such as a button, and then subsequently change the name of the button, thebehavior script does not show the updated name. You must name all your objectscorrectly before setting up behavior scripts.
Final thoughts
I am happy to say that SimWriter has been a tool well worthmy time to review, so much so that I plan on investigating it even further inthe next few months and using it in real-world projects.
To learn more, head over to https://simwriter.com/.