


This month we’re going to create a complete mobile app. Instead of creating a native app that works only on Android or iOS we’re going to create an HTML5-based app that works across multiple platforms. Since media is so critical in eLearning (and I thought it would be fun) I decided to create an MP3 player application. Figure 1 shows the user interface (UI). As you get ready you might want to grab a couple of your favorite MP3’s as you’ll likely be hearing them over and over again as you complete this tutorial.
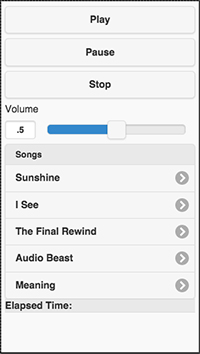
Figure 1: MP3-player mobile application user interface developed in
HTML, CSS, JavaScript, and jQuery Mobile
This application is going to be developed using four technologies. They are:
- HTML: HTML markup is used to build the scaffolding of the application and the user interface.
- JavaScript: Interactivity is built within the application using the JavaScript programming language. The essential logic is coded in JavaScript.
- jQuery: This JavaScript framework is used to style the elements that appear within the user interface.
- PhoneGap: Adobe’s free PhoneGap library is used to “wrap” the application and make it work the same as native apps across the spectrum of devices.
Let’s start by creating an application template with PhoneGap and modifying it for our own use. Please note that you will also need a text editor to complete this tutorial. I use Brackets, which is also produced by Adobe and available at www.brackets.io.
Getting ready: creating the PhoneGap application
In this initial section of the tutorial we’ll create a PhoneGap application and modify the template provided for our own use.
(EDITOR’S NOTE: Because of the extensive code listings in this article, we recommend you view it on a desktop display or tablet, rather than on a smartphone. If you must view on a smartphone, we recommend viewing the article in landscape orientation rather than portrait.)
- Visit www.PhoneGap.com and click the “Install”
button on the upper right hand corner of the interface (Figure 2).
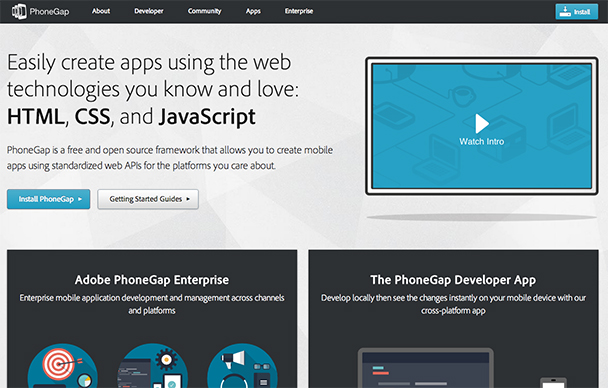
Figure 2: The PhoneGap website. The install button appears on the upper right. You may wish to view the helpful intro video provided on the page.
- The
installation process is easy. As the install page instructs, make sure you have
NodeJS installed. (If not go to nodejs.org
and click the big green install button.) Next open your command line and issue
the following command:
sudo npm install -g phonegap
On a Mac the command line is accessed through the “terminal” utility. On a PC it can be accessed through the start menu.
The install process can take several minutes and you must have an active Internet connection to complete it.
- With PhoneGap installed, we’ll now create the PhoneGap template
app. When you create a new PhoneGap application, a template app is installed by
PhoneGap. This template is essentially a placeholder and most of it can be
removed. To create the PhoneGap app, make sure your command line is pointed at
the location where you want to save the app. I used the desktop (see Figure 3).
(You can use the cd command on the
command line to change directories on Mac and PC). Issue the following command
to create the PhoneGap template app:
phonegap create musicPlayer
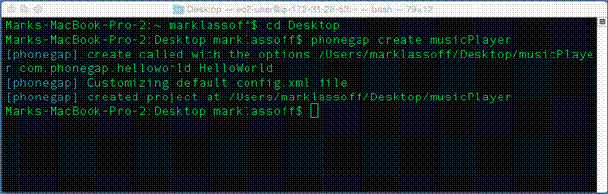
Figure 3: Command line after create template application
-
The command you issued created a folder called musicPlayer. Open that folder and then the www folder inside it. Inside that folder delete everything except config.xml and index.html. The files and folders we’re deleting are those we don’t need for the template application.
-
Open index.html in your text editor. There are references to the template application in the code that we don’t need. Edit your code so it appears as below:
<!DOCTYPE html> <html> <head> <meta charset="utf-8" /> <meta name="format-detection" content="telephone=no" /> <meta name="msapplication-tap-highlight" content="no" /> <!-- WARNING: for iOS 7, remove the width=device-width and height=device-height attributes. See https://issues.apache.org/jira/browse/CB-4323 --> <meta name="viewport" content="user-scalable=no, initial-scale=1, maximum-scale=1, minimum-scale=1, width=device-width, height=device-height, target-densitydpi=device-dpi" /> <title>Hello World</title> <script type="text/javascript" src="cordova.js"></script> </head> <body> </body> </html> - The basic template above can be used for any
application. Let’s add a little HTML and CSS to create a container for our UI. I
like using a container because it makes layout easier. We’re going to be adding
just a few lines of code. Inside the body tag add the following:
<div id="container">
</div> <!-- container -->
- Next we’ll add the CSS to format the container. We’ll
add some spacing around the margins of the screen to make everything appear
cleaner. Add this code right before the closing head tag. (See Figure 4 to
verify that everything you’ve entered so far is correct.)
<style>
#container
            {
                margin: 6px;
            }
</style>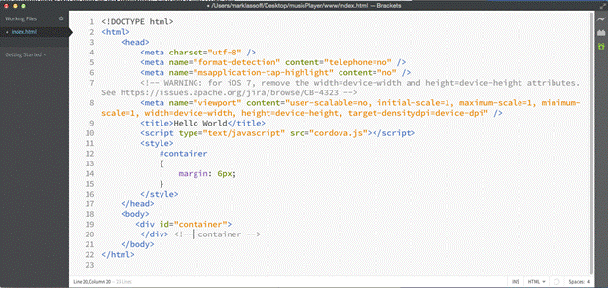
Figure 4: Code so far in the Brackets editor
Creating the user interface
We’re going to use jQuery Mobile to style our user interface (UI). We’re going to add the code to connect to the jQuery Mobile library and the HTML to display the user interface. You’ll notice the HTML embeds attributes designed to style the components with the jQuery library.
- Right after the title tag add the following three lines
of code. HINT: Visit http://jquerymobile.com/download/
and you can copy and paste the code from there.
<link rel="stylesheet" href="http://code.jquery.com/mobile/1.4.5/jquery.mobile-1.4.5.min.css" /> <script src="http://code.jquery.com/jquery-1.11.1.min.js"></script> <script src="http://code.jquery.com/mobile/1.4.5/jquery.mobile-1.4.5.min.js"></script> - The code above connects to the necessary jQuery scripts
and CSS via a fast content-delivery network. Now we’ll use jQuery and HTML to
create our user interface. You’ll insert this code inside the container created
earlier in the tutorial.
<audio id="player"/> <source src="assets/sunshine.mp3" /> <source src="assets/sunshine.ogg" /> </audio> <button id="btnPlay">Play</button> <button id="btnPause">Pause</button> <button id="btnStop">Stop</button> <label for="rngVolume">Volume</label> <input type="range" id="rngVolume" min="0" max="1" step=".01" value='.5' data-highlight="true" onchange="changeVolume()"/> <ul data-role="listview" data-inset="true"> <li data-role="list-divider">Songs</li> <li><a href="#" onclick="changeSong('sunshine')">Sunshine</a></li> <li><a href="#" onclick="changeSong('iSee')">I See</a></li> <li><a href="#" onclick="changeSong('finalRewind')">The Final Rewind</a></li> <li><a href="#" onclick="changeSong('audioBeast')">Audio Beast</a></li> <li><a href="#" onclick="changeSong('meaning')">Meaning</a></li> </ul> <div data-role="footer"> <output id="timeOut">Elapsed Time:</output> </div> -
This is a good point to view our work so far in a web browser. Load the index.html from the www folder into the web browser. Your UI should appear like Figure 5:
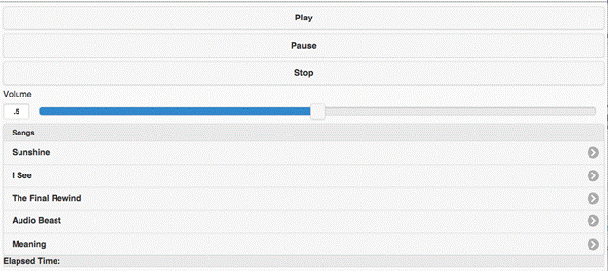
Figure 5: Testing the UI in the browser -
If your UI doesn’t appear as in Figure 5, check your code and insure it’s correct. There is a complete code listing at the end of this tutorial. If you’re using Google’s Chrome browser you can view the UI as it might appear in various mobile devices. Open Chrome’s Developer tools by clicking View → Developer → Developer Tools from the drop-down menus (see Figures 6 and 7).
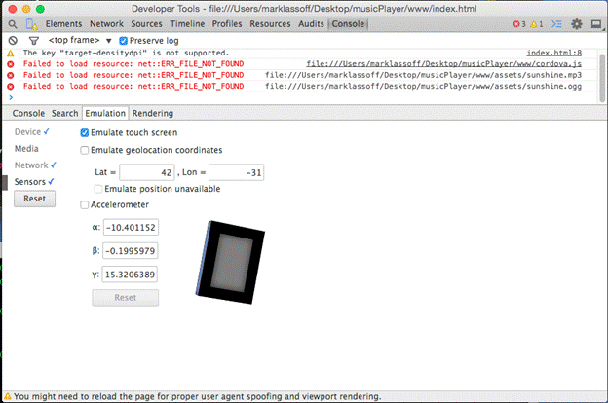
Figure 6: Chrome Developer Tools. Choose Console from the menu at the top and Emulation from the tabs below the log.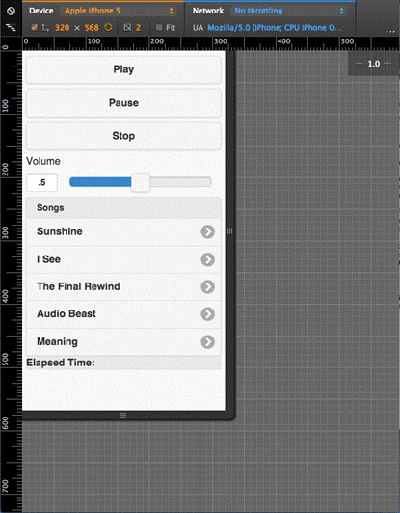
Figure 7: The UI displayed as it might look on an iPhone. You can use the Device drop-down to choose a specific device you’d like to emulate.
Adding the guts: JavaScript to make it work
In this final section of the tutorial we’ll add the necessary JavaScript code to make the MP3 player work. Enter the code exactly as listed and we’ll break down the code and explain the various sections in a bit.
It’s also probably a good time to add our MP3’s to the project. We’ll take care of that as well.
- Enter the following code right after your closing style
tag in the document head.
<script> var player; var rngVolume; var intv; window.onload = function() { init(); //document.addEventListener('deviceready', init, false); } function init() { player = document.getElementById('player'); var btnPlay = document.getElementById('btnPlay'); var btnStop = document.getElementById('btnStop'); var btnPause = document.getElementById('btnPause'); rngVolume = document.getElementById('rngVolume'); btnPlay.addEventListener('click', playMusic, false); btnStop.addEventListener('click', stopMusic, false); btnPause.addEventListener('click', pauseMusic, false); } function changeVolume() { player.volume = rngVolume.value; } function pauseMusic() { player.pause(); } function playMusic() { player.play(); startTimer(); } function stopMusic() { player.pause(); player.currentTime = 0; stopTimer(); } function changeSong(song) { stopTimer(); player.pause(); player.src = "assets/" + song + ".mp3"; player.play(); startTimer(); } function startTimer() { intv = setInterval(updateTime, 1000); } function stopTimer() { clearInterval(intv); } function updateTime() { document.getElementById('timeOut').innerHTML = "Elapsed Time: " + secsToMins(player.currentTime); } function secsToMins(seconds) { var minutes = Math.floor(seconds/60); var theSeconds = seconds - minutes * 60; if(theSeconds > 9){ return minutes + ":" + Math.round(theSeconds); } else { return minutes + ":0" + Math.round(theSeconds); } } </script> -
Inside your www folder create a folder called “assets.” This folder will hold our MP3’s. (If more convenient for you, you may download the MP3 samples used in this lesson here.)
-
Place the MP3 files inside the assets folder. If you use the sample files I’ve provided, no further changes are needed. If you use your own you’ll have to replace the names of the songs and files in the HTML. There are a number of lines in the HTML that look like this:
<li><a href="#" onclick="changeSong('sunshine')">Sunshine</a></li> -
If changing the MP3’s, inside the changeSong() function, replace the filename sunshine with the name of your file. Don’t add the .mp3 extension—that’s taken care of in the JavaScript. You’ll also want to change the name of the song displayed before the closing <a>nchor tag. Once you’ve changed your file names (if you’re not using the samples provided) it’s time to test your player.
-
Once again load your index.html file into the browser. Press play and listen to that sweet music!
-
Test all the features of your MP3 player. If they don’t work correctly (or at all) review the code below and see where you made an error.
Congratulations! You’ve developed a full mobile app.
Here’s the full code for the MP3 player for your reference:
<!DOCTYPE html>
<html>
    <head>
        <meta charset="utf-8" />
        <meta name="format-detection" content="telephone=no" />
        <meta name="msapplication-tap-highlight" content="no" />
        <!-- WARNING: for iOS 7, remove the width=device-width and height=device-height attributes. See https://issues.apache.org/jira/browse/CB-4323 -->
        <meta name="viewport" content="user-scalable=no, initial-scale=1, maximum-scale=1, minimum-scale=1, width=device-width, height=device-height, target-densitydpi=device-dpi" />
        <link rel="stylesheet" href="http://code.jquery.com/mobile/1.4.5/jquery.mobile-1.4.5.min.css" />
        <script src="http://code.jquery.com/jquery-1.11.1.min.js"></script>
        <script src="http://code.jquery.com/mobile/1.4.5/jquery.mobile-1.4.5.min.js"></script>
        <script type="text/javascript" src="cordova.js"></script>
        <style>
            #container
            {
                margin: 6px;
            }
        </style>
        <script>
            var player;
            var rngVolume;
            var intv;

            window.onload = function()
            {
                init();
                //document.addEventListener('deviceready', init, false);
            }

            function init()
            {
                player = document.getElementById('player');
                var btnPlay = document.getElementById('btnPlay');
                var btnStop = document.getElementById('btnStop');
                var btnPause = document.getElementById('btnPause');
                rngVolume = document.getElementById('rngVolume');

                btnPlay.addEventListener('click', playMusic, false);
                btnStop.addEventListener('click', stopMusic, false);
                btnPause.addEventListener('click', pauseMusic, false);

            }

            function changeVolume()
            {
                player.volume = rngVolume.value;
            }

            function pauseMusic()
            {
                player.pause();
            }

            function playMusic()
            {
                player.play();
                startTimer();
            }

            function stopMusic()
            {
                player.pause();
                player.currentTime = 0;
                stopTimer();
            }

            function changeSong(song)
            {
                stopTimer();
                player.pause();
                player.src = "assets/" + song + ".mp3";
                player.play();
                startTimer();
            }

            function startTimer()
            {
                intv = setInterval(updateTime, 1000);
            }

            function stopTimer()
            {
                clearInterval(intv);
            }

            function updateTime()
            {
                document.getElementById('timeOut').innerHTML = "Elapsed Time: " + secsToMins(player.currentTime);
            }

            function secsToMins(seconds)
            {
                var minutes = Math.floor(seconds/60);
                var theSeconds = seconds - minutes * 60;
                if(theSeconds > 9){
                    return minutes + ":" + Math.round(theSeconds);
                } else
                {
                    return minutes + ":0" + Math.round(theSeconds);
                }

            }
        </script>
        <title>Audio Video</title>
    </head>
    <body>
        <div id="container">
            <audio id="player"/>
                <source src="assets/sunshine.mp3" />
                <source src="assets/sunshine.ogg" />
            </audio>
            <button id="btnPlay">Play</button>
            <button id="btnPause">Pause</button>
            <button id="btnStop">Stop</button>
            <label for="rngVolume">Volume</label>
            <input type="range" id="rngVolume" min="0" max="1" step=".01" value='.5' data-highlight="true" onchange="changeVolume()"/>
            <ul data-role="listview" data-inset="true">
                <li data-role="list-divider">Songs</li>
                <li><a href="#" onclick="changeSong('sunshine')">Sunshine</a></li>
                <li><a href="#" onclick="changeSong('iSee')">I See</a></li>
                <li><a href="#" onclick="changeSong('finalRewind')">The Final Rewind</a></li>
                <li><a href="#" onclick="changeSong('audioBeast')">Audio Beast</a></li>
                <li><a href="#" onclick="changeSong('meaning')">Meaning</a></li>
            </ul>
            <div data-role="footer">
	           <output id="timeOut">Elapsed Time:</output>
            </div>
        </div><!-- container -->

    </body>
</html>
Feeling lazy? I’ve posted the entire MP3 player, public domain music, and other content here. You can thank me later.