


And here we are … finally … the Photeo Tutorial. In the next three articles, we’re going to show and tell how to develop a Photeo project, based on the two projects we discussed in our March 26, 2012 article.
- Pt. 1 - Photo + Movement = Photeo
- Pt. 2 - Putting a Photeo Together
- Pt. 3 - Photeo Tutorial 1
- Pt. 4 - Photeo Tutorial 2
- Pt. 5 - Photeo Tutorial 3
Here’s a quick recap. In Part 1, we explained what Photeo is and what it can be. In Part 2, we wrote about why you’d want to make Photeo for your training and when it’s appropriate.
In this article, we will show you how to make a “photo Photeo” project like the one from Megan in Part 2. You may recall that this genre of Photeo uses photographs you’ve shot in a sequence for a project, or photographs you’ve purchased that have a generic look to them related to the subject matter.
If you want to work along with the article (recommended!), you will need PowerPoint and Articulate Presenter. Use your own photos or PowerPoint slides to apply the steps we outline here.
Megan’s project – Sun is Life
One set of tools we use to create simple-yet-sophisticated Photeos is Articulate Presenter and Microsoft PowerPoint. We use PowerPoint 2010, so some of the options, menus, and buttons in our explanation may differ slightly from older versions of this software.
Making a photo Photeo with Articulate Presenter – start with your script
Begin by adding a symbol in your script everywhere you’ll want a new photo or an animation to take place. We use “»” (Figure 1) as our symbol because this isn’t a symbol that would ever occur in our script for any other reason, and then we can easily find them later to take them out. It also jumps out on the screen as you’re scanning text, so it’s a good one for us.
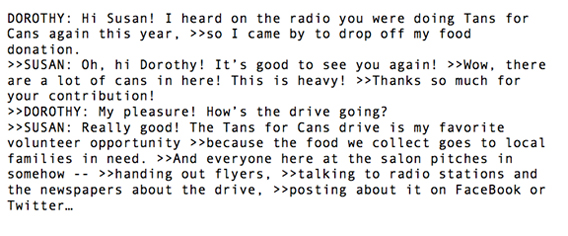
Figure 1: Marking locations for new photos and animations using “»”
Find what works for you. This will help you determine approximately how many photos you’ll want or need for your Photeo.
While we’re on the subject: how often should you have a new image? We find that as a rule of thumb, one photo every four seconds works pretty well, but your script may warrant slightly more or slightly fewer photos. We like to have one image for every sentence, or for every phrase in a longer sentence.
Go collect your assets (photos in this case, and audio files).
Build your presentation
(Editor’s Note: For anyone who is not familiar with Articulate Presenter and who may be reading through this tutorial without having installed the software, Articulate Presenter does not have its own interface. Instead, it is an “add-in” for PowerPoint. This means that everything in this tutorial that refers to menus, dialogs, panes, and so on, refers to what you will see in PowerPoint.)
A simple Photeo sequence is built on one or more PowerPoint slides. Install Articulate Presenter if you haven’t already done so. Launch PowerPoint and open a new presentation.
Before you even begin adding images to the PowerPoint presentation, you’ll want to open the Selection Pane (Figure 2), which will make building go much more smoothly. Find the Select button in the home tab of the PowerPoint ribbon. Click the Select button (on the far right) and then in the drop down menu click Selection Pane.
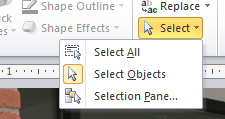
Figure 2: The Selection Pane
The Selection Pane is key because it allows you to hide and unhide each object, text box, etc. in your slide to access objects that are hidden underneath other objects. You can also reorder your objects using the up and down arrows near the bottom of the selection pane.
You can do the hiding and unhiding all at once (Figure 3) or one at a time (click the picture of an eyeball in the box next to each object in the list). Without the Selection Pane, you have to repeatedly rearrange the objects on your slide to access the ones that you need (i.e., by using the send-to-back, bring-forward, etc. commands).
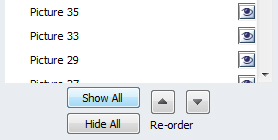
Figure 3: Use the “eyeball” icon to select images individually.
So now that you’re all set to go, you can start adding images to your PowerPoint slide. You can add them in one at a time if you like, or all at once, and then use the Selection Pane to hide, reorder, and adjust the layers. Organize them so that the first photo that appears in your Photeo is at the very bottom of the list (this is important later, when you’ll be setting the animations).
Usually we make our Photeo with full-bleed photos to give it a more movie-like effect. Resize your images in PowerPoint accordingly. (Editor’s note: A “full-bleed” photo is one that has no margins. Take a look at Megan’s project in the previous article.)
Animate!
After all your photos are in place and sized correctly, you are ready to move on to animations. For this you’ll want to open your Animation Pane – under the Animations tab, click Animation Pane. (Figure 4)
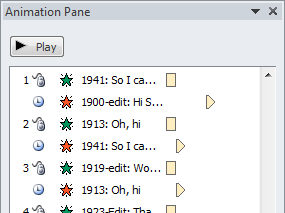
Figure 4: The Animation Pane
Don’t close the Selection Pane, though, because you’ll still want to use that during this process, too. (About now, you’ll really be loving your widescreen monitor.)
Select all the images on your slide, set them to “fade in” at 0.5 seconds, and set the trigger as On Click. We like 0.5 seconds a lot; a longer fade doesn’t really animate smoothly once the course is published, and anything shorter just looks sort of herky-jerky, although that might be a look you’re going for depending on the situation.
Next, with all your images still selected, set them to Disappear, using the After Previous trigger. Reorder the Disappear animations for each image so that they will disappear after the next image (the one on top of it) appears. This is key to having a smooth Photeo that doesn’t lag once you publish it using Articulate.
To spice up your Photeo you may want to add some additional animations. The ones we’ve found work the best are “Motion Paths,” which simulates a panning effect, “Grow/Shrink,” to simulate a zoom, or a combination of the two. By sizing an image to be much larger than the slide on which it sits, you can hide a portion of the photo off screen and then reveal it by using a motion path.
Now that you’ve got your animations all set, it’s time to sync them with your audio. Keep in mind that after you publish and preview the course, you may need to go back, adjust, and tweak to get your Photeo just how you imagined it.
Articulate tips
1. After adding photos to the slide you may want to rename them in the Selection Pane. Just click on the name that PowerPoint automatically gives your photo (usually something like Picture 13) and type in whatever you’d like to call the picture so that you can more easily recognize it later.
Just be careful to not use any symbols or punctuation as some of these can affect Articulate’s publish and cause you a world of troubleshooting hurt later on. Sometimes it’s helpful to use the name of the picture itself (i.e., IMG_3678) just in case you need to edit the picture in some way. This will allow you to easily find the picture again on your hard drive and, using PowerPoint’s “change picture,” you can replace it with the new image without having to resize or rebuild animations.
2. Sometimes when Articulate publishes it can “nudge” your pictures a little bit one way or another. To ensure that your photos are truly full-bleed, make them just slightly larger than the PowerPoint slide on all sides.
3. To make your Photeo creation process go more smoothly, remember that Articulate doesn’t support all of the PowerPoint animations. Our go-to animations that don’t give us much trouble are Fade In, Wipe-In, Fly-In, Motion Paths (although reverse direction doesn’t work), Grow/Shrink, Flash Bulb, Disappear, and Fade Out.
Parting words
We typically build a Photeo sequence all on one slide in PowerPoint if it’s shorter than 30 seconds, give or take a few. Longer than that and the load time becomes a factor with all the images stacked up on there, so we make logical breaks across several slides. Just remember that your slide-to-slide transitions are not as smooth as your within-slide animations in Articulate.
The next two articles will walk you through the build of a more involved project, such as Steve’s “Housekeeping” scavenger Photeo in the September 26 article. For these tutorials, you will need After Effects, Premiere Pro, Photoshop (or Photoshop Elements), and Adobe Audition.
See you next week for the next installment!