


Light. Without it, you can’t make video. Heck, without light you can’t see! Two pretty simple and obvious statements, right? But like so many other elements of the media we use in eLearning, it’s not something we can take for granted. Here’s how to do lighting well when you’re shooting video for eLearning.
Let there be light
Usually we don’t notice light in a scene, whether we’re looking at it live or in a video. Most lighting isn’t supposed to be seen. It’s supposed to be a natural part of the scenic “landscape” that enhances experience. Lighting can focus the viewer’s eye where you want it to go. This is why lighting, the way you light, and the kinds of lights you use are important.
When you shoot outdoors, you need to be able to control the light to some extent with reflectors, white cardboard, or whatever you can think of that will serve to balance light and shadow. Cameras can’t see shadows as well as your eyes can, so this balance is important. No camera is as good as your eyes.
When you shoot inside, you need lights. In an office with typical overhead fluorescent lighting, the lighting is from above, which makes for strange shadows. Fluorescent lights give camera sensors (and film too!) a green cast. You need lights to lose that ugly green fluorescent cast and the odd shadows.
Luckily for you, there is a plethora of choices. Unluckily for you, there is a plethora of choices. It can make life confusing. You have the choice of different kinds of incandescent lights, fluorescent lights, LED lights, and a few other technologies that can illuminate a scene. But whatever technology you ultimately use, you should be aware of the plusses and minuses that each type offers, how to use each type, and what you need for a lighting “kit.
The basics of lighting
What do you need to know to do lighting well? The answer is simple, but complex at the same time. You need to know:
- Some basic lighting technology, terms, and craft.
- How your camera “sees” light.
- What kinds of lights to use, both:
- The types of lights and
- The types of bulbs
- How to basically light a shot. (Once you know how to light one person, you can probably light anything. Really! It might not be at the level of a great lighting director, but it will be better than good.)
Vocabulary of lighting
First, let’s start with some basic lighting terms.
Kelvin
Kelvin refers to the color temperature of light: the higher the number, the “bluer” the light. Daylight is the standard and it’s around 6000-6500K. (The trailing K is the standard way of notating Kelvin.) In contrast, incandescent lights, such as regular light bulbs, tend to be around 3200-3400K.
Spotlight
Spotlight refers to a focused kind of light. Frequently the light itself is focusable, meaning that you can make the spot part of the light smaller or larger. The lights themselves are called many things: Fresnels, lekos, spots, and the list goes on, and on, and on. The names all boil down to “focused light that creates a spot.”
Floodlight
A floodlight is a softer light than a spotlight. Floods don’t have the “sharp” edges that spotlights have, and are meant to cover a more general area with light. Floodlights are also called: scoops, fill, soft light, or light boxes, but they all mean softer light than a spotlight.
Fill
Fill refers to more diffuse lighting. Some manufacturers use this term for their floodlight.
Softbox
A softbox is another kind of floodlight with a nicer name. Usually these are LED or fluorescent lights with several bulbs inside a sheer fabric that diffuses the light.
Practicals
Practicals are anything that’s available as a light source. A street lamp at night, an indoor lamp, a flashlight: anything that throws light can be fair game for lighting your scene. And with cameras getting more and more sensitive, you need less and less light for a scene. You don’t need to light less, but you don’t have to make your “set” as bright as mid-day on the equator either.
How cameras see light (color temperature)
Today’s video cameras and Digital Single-Lens Reflex cameras (DSLRs) are far different than cameras of yore. Cameras used to run long lengths of celluloid with little holes on the sides. To properly use an emulsion of silver halide particles on the surface of the film, you had to match the color of the light to the color sensitivity of the film.
With film, there was no way to make an overly orange or green face into a more natural-looking face. That was caused by a mismatch of the color temperature sensitivity of film to the actual temperatures of the lights. That problem doesn’t exist anymore.
With digital video, if the color isn’t correct, you can usually correct the color with one click. So, why the concern about color temperature?
|
Figure 1: Kelvin color temperatures of various light sources. |
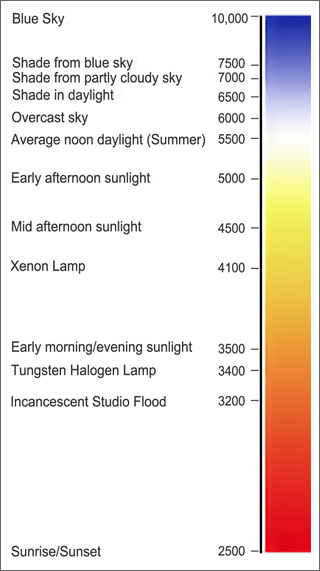
You still need to match the color temperature of lights to each other (Figure 1). Suppose you’re shooting outside in daylight and need to light up, say, some people under a tree. If you use incandescent lights to do that, you could get natural looking people and unnatural looking trees. Our eyes are very adaptive, so you won’t really see big differences in the color temperature color casts of the incandescent lights and the sunlight (the sun is a light source) unless you really concentrate on it. But the camera will definitely see the difference, and the shot won’t come out looking the way you expected. Here’s another example. I was working with a client today who was talking about using some office fluorescent lights in a photo shoot, and then supplementing the overhead lights with tungsten floodlights. The client had a really difficult time getting the flesh tones to look right. That’s because of mixed color temperatures. Figure 1 shows the Kelvin color temperature of various light sources.
One more note about cameras regarding light. Cameras are indeed more sensitive to light than they were a few years ago. This is good, but it’s also a prescription for bad lighting. All lighting is circumstantial. By that I mean that the light in a scene is a circumstance of what the scene is supposed to be. So having someone lit by a table lamp while delivering important messages may or may not work to your advantage.
I’m a believer in simple set-ups for lighting our (generally small) eLearning video productions. The simple way to light these smaller shoots is usually the best.
Lights, lamps, and your lighting kit
I’ve already discussed what types of lights (flood, spot) we use in video lighting. In Table 1, I’ve listed the different lamp types along with the plusses and minuses of each. The table lists the simplest, least expensive, and most commonly used lamps first.
Type of lamp |
Advantages |
Disadvantages |
|
Incandescent — Photoflood These are just like your regular old light bulbs in the house, except the bulbs are graded for color temperature. They’re designed to operate at 3100-3200K |
Cheap — Photoflood bulbs only cost fractionally more than a regular light bulb. Fixtures and stands are cheap too. They operate no hotter than a standard light bulb until you get into the high-wattage bulbs. |
The bulbs change color temperature over time (they get redder), but with white balance, it’s not really a disadvantage any more. |
|
Incandescent — Halogen These bulbs are graded at 3200K and are the staple bulbs (or were before LEDs became widely available) for video production because of their high output. However, see the Disadvantages listed at the right. |
Color doesn’t change over time. Very steady lighting with good bulb life |
Run very hot. You have to put a screen over them in case they explode (really, a pop is more like it). Expensive bulbs and fixtures. You can’t touch them with your fingers because the oil on your fingers will boil and cause the bulb to pop. |
|
Xenon — These lamps are much “whiter” than incandescent and operate at around 4100K |
Very white light. Runs cool. |
Very expensive. They take a special kind of ballast. |
|
LED — This is the new technology. Lightweight and cool running, they also have an unique feature; on some of them you can set the color temperature from about 3200K to 5600K, which is almost as white as sunlight. In LEDs, what you pay for is pretty much what you get. |
Can be “tuned” by the manufacturer to whatever color temperature you want. They run very cool. They’re lightweight. You can pack a lot of light in a small space and they run on very little power. |
Expensive for good ones. Poorly made LEDs are subject to different wavelengths that no color correction can make better in post-production. You need a lot of little LEDs to give much light. |
|
Fluorescent — Just like the tubes you see in the store, except they are color graded. For my money, they still have a green or blue cast. |
Stable lighting: the bulbs last a long time. |
The lights tend to be on the big side. If you’re in a studio, then it’s usually no worries, but on location, it can be a royal pain. The light itself is a strange color. |
What do you need to light a shot?
So what does a basic lighting set-up look like? This kit is designed to efficiently and simply light one or two people:
- Lights — total of three lights.
- Two flood lamps
- One spotlight
- Stands for all the lights — these usually come together in a kit with the lights.
- Reflectors — These can be anything from white cardboard to aluminum fabric reflectors that can be mounted on a stand. Cost is from zero to $75.00
- Extension cords and four way plugs — Get heavy duty ones from Home Depot or your local hardware store. If you can’t get an extension cord with a four way, you can get a heavy duty one. Note: you use heavy-duty cords because you’ll potentially have up to several thousand watts of light per cord with four lights.
- For lighting outside, some sandbags are a good thing to put on the stands so the lights don’t blow over.
- Reflectors or umbrellas soften the light by reflecting it from a surface. This is sometimes good where you might have to balance the light or make it softer.
- Spare bulbs — need I say more?
You can put together a kit like this for under $300 for a photoflood incandescent kit and $800.00 to $900.00 for a halogen kit. LED lighting will set you back almost $3000.00 for equivalent lights, and Xenon is even more expensive. Fluorescent lighting will cost about the same as halogen.
Conclusion
Lighting isn’t hard. If you’re shooting one person on camera, all you need to do is set up the key light, usually your spot, on the left. This highlights the face from left to right. Then fill it in on the other side with one of your floodlights, and use the third light (your other flood) to light the person from behind (if you’ve got the room) in order to separate your subject from the background and voila!, you’re done. (Figure 2)

Figure 2: Sketch of basic lighting for a single subject.
[Editor’s Note: Steve provides some additional advice about Three-Point Lighting in his earlier article, “Making A Demonstration Video for eLearning Use,” Learning Solutions Magazine, March 30, 2009. Today’s article updates the information about light types in that earlier piece.]
I’ve seen some people go crazy and get portable dimmer boards, lots of cables, lots of lights, reflectors, stands, lots of everything. And then they try to light a scene containing one stationary person with eight or ten lights. This is way too complex and doesn’t add any value to the resulting video, although those who do this might argue otherwise. At the end of the day, your lighting only needs to look natural (unless you’re doing some dramatic work) and complex lighting only adds set-up and tear-down time. This adds to your client’s cost. You don’t need that.