
In 2011, I reviewed an early version of easygenerator and at the time I wrote that the cloud-based authoring tool impressed me, primarily because itincorporated version control, with the ability to jump back to prior versionseasily, and because it was one of the first tools to include the ability tolink content so that you could, for instance, have the same content being usedby both a desktop version and a mobile version.
Of course, a lot has changed in the industry since then.While some organizations still see fit to maintain two separate sites, one fordesktop and one for mobile, most developers now build web sites that supportthe idea of authoring once and delivering to multiple devices, either throughresponsive design or through other means. I also liked easygenerator because itincluded the ability for external reviewers to access and comment on courses, afeature still lacking in many authoring tools.
Fast forward to the present day. easygenerator has a newlook, new features, new… well, just about everything looks new. The biggestchange may be that easygenerator now primarily aims at authors who do not havean eLearning background.
Step by step through the menus
When you first log in, you are shown a clean and simple setof choices (Figure 1).
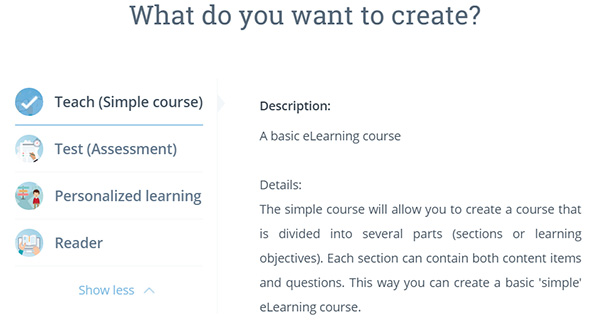
Figure 1: The Creation Menu
As you can see, easygenerator can be used in various ways. Don’tworry: each uses similar options, though each is focused on the type of courseyou’re creating.
There is an additional option not shown in Figure 1, whichis to start by uploading a PowerPoint file. Let’s start with the first option,Teach.
Teach.
Teach is used tocreate a straightforward, standard eLearning course. There are five steps tothe process, as seen in Figure 2. What I like is that it does ask you to defineyour objectives before you add any content, thereby guiding the instructionaldesigner to think before adding content. One of the most common mistakes fordesigners (and developers) is starting to build a course without putting anyreal thought into the objectives the learner needs to meet. That means thecontent may be very unfocused. Kudos to easygenerator for including thiscrucial step.

Figure 2: Step-by-step instructions
Whenever you type in a textfield, such as filling out the objectives, as seen in Figure 3, a handy formatbar appears so that you can make the text look the way you want.

Figure 3: The Text Format Bar
Following writing the objectives, you start to build thecourse. Helpful but unobtrusive animated instructions guide you through theprocess of setting up one or more sections. Much of this is done by draggingand dropping the elements that you see in Figure 4. It’s very easy (whichvalidates the name of the tool!) and I really like the fact that you canorganize the content and question items first,and then go back to fill in each of those items.

Figure 4: TheChoices
For instance, in Figure 5, I’ve created a section in which Iplaced content, then a multiple-choice question, then another content area anda fill-in-the-blank question. You can string together as many content andquestions as you like. It’s helpful to name each as you do so, but you don’thave to enter the information for each until you’re ready.

Figure 5: Contentand Questions
When you wish, you can also collaborate with other authorson a course, preview the current state of the lesson, and share the course withothers as a link or with an embed code. See Figure 6.

Figure 6: Options
In fact, you can preview the sequence of content and questionseven before you enter the information to get a feel for what the learner willexperience. The learner can take a break at any time and return to the point atwhich he or she left.
Test (Assessment)
In this mode, you create a series of questions that arepresented all together, much like the tests you took in school. In this modethe objectives are not shown to the learner, but they are used for tracking andtracing. You can reuse the content you created for a course and it will filterout just the questions. There are several ways to configure the test, includingrandomizing the questions from a pool. See Figure 7.
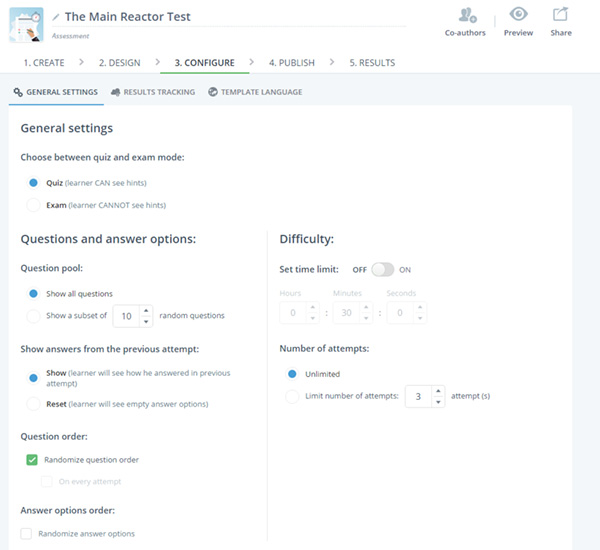
Figure 7: TestOptions
You can also see the results of learners taking the test onthe site directly.
PersonalizedLearning
This option for a course will first present the learner withall the questions in an assessment, after which easygenerator will advise thelearner as to where his or her weak points are and allow the learner to reviewthe content in those weak areas. Again, you can reuse your content and justhave to switch to this type of publication.
Reader
A Reader course is all about content, if you publish a coursewith questions, all the questions will be left out automatically. It is meantto present the course content alone.
Other important features
Library: You canupload images, audio, and videos to your own library so that you can use themedia you and your co-authors select more quickly in your courses.
Learning Paths: Thisis currently in open Beta, so you can try it out now. It helps you to createcourses that are not linear and boring.
xAPI: easygeneratoris taking xAPI reporting seriously. In fact, while it is SCORM-compliant, it takesadvantage of xAPI protocols to go beyond what you normally can do with SCORM.
Results areResponsive: Your courses will look good on devices as it will automaticallyresize and rearrange options to show the best results on desktops and devices.
Pricing
There are four pricing plans, from free to $59 per month.Clearly, each price point offers different features, such as the number ofcourses you can create and whether you can move courses to your own servers. Youcan find pricing information at https://www.easygenerator.com/pricing/.
Set up a free account and try it out (you will get a 14-day full trial). Once you get agood feel for easygenerator and decide it will serve you well, you can choosewhich price point will fit you best.