Unless you have been hiding behind a rock for the last few years, you have heard of iSpring Suite. If you’ve attended a Guild conference (and if you haven’t, you really should), you no doubt have seen the iSpring booth in the Expo Center. In fact, you may already be a big fan of this PowerPoint add-in eLearning development tool.
iSpring was one of a few that I reviewed and compared in May this year, the others being Adobe Presenter, Articulate Studio Pro, Microsoft Mix, Snap! by Lectora, and Zenler Studio Pro Plus. Among these, the two that have the most frequent updates are Adobe Presenter and iSpring Suite. I reviewed the update to Adobe Presenter last month. This month I review the recent update to iSpring Suite, now in version 8.
Compare the Microsoft ribbon that iSpring provided in version 7 with that in version 8 in Figure 1 below, and you can immediately see the first change, found in the Insert section, two new options: Simulation and Screen Recording. Notice also the new flatter look of the ribbon. I know a lot of people like a flatter look while I’m one of those who prefer a little color.
Figure 1: Comparing the V7 iSpring ribbon (top) with the V8 ribbon (bottom)
When you click the new Simulation option, it launches a separate app called iSpring TalkMaster, as seen in Figure 2.

Figure 2: The TalkMaster dialog
Simulations
Lest you think that we’re talking software simulations here, we’re not: we are referring to creating scenario dialogs that you can deliver to any device. This is my favorite new feature in iSpring. (I’ll get to Screen Recordings after this.)
To build a simulation, you start by creating a new scene. Choose a character (in essence, the actor), and the character’s starting emotion, which will change the character’s facial expression, as you can see in Figure 3.

Figure 3: Choose a character and an expression
Next choose the background you wish to have, as in Figure 4.

Figure 4: Choose a background
Now for each step in our simulation, you use the dialog you see in Figure 5, in which you choose what the character’s emotion is at this juncture, type what the character will say, and provide the learner with either a set of optional responses from which to choose or provide a feedback, which is meant to let the learner know whether their last response was good, bad, or ugly. I also find it useful to provide an immediate response to the character (such as I have done in Figure 6).

Figure 5: Create a scenario scene
In Figure 6, which represents the first scene (hence the #1 in the top right corner), we have provided an immediate feedback. Notice you can add an image to the feedback as well. The Images tab lets you change the character and/or the background images in this scene while the Properties tab lets you change the scene color and scene score (in the case of giving the learner responses from which to choose).

Figure 6: Developing a scenario scene
You can
click the ![]() button to preview the scene, click the
button to preview the scene, click the ![]() button to see the scene as a starting point,
or delete the scene. In Figure 7 below, you can see the preview of our dialog
above. Notice the gauge at the top right that shows the character’s emotion.
button to see the scene as a starting point,
or delete the scene. In Figure 7 below, you can see the preview of our dialog
above. Notice the gauge at the top right that shows the character’s emotion.

Figure 7: Preview of the scenario scene
Closing the scene will show a collapsed screen, as you see in Figure 8.

Figure 8: A collapsed scenario scene
Notice in
both Figures 6 and 8 you can see a little link icon ![]() . Clicking and dragging that out
to an open area will automatically create a new scene based on the one you have
currently selected. See Figure 9.
. Clicking and dragging that out
to an open area will automatically create a new scene based on the one you have
currently selected. See Figure 9.
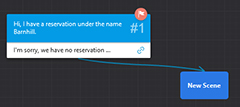
Figure 9: Creating a new scene
The new scene will open and you can make changes to that scene just as you did to the first. You can also create scenes separately and then tie them together with the link icons rather than creating each scene from a scene just completed. In Figure 10 you can see how in Scene 2 I have allowed the learner to choose from three responses that can be used with the hotel guest. Each goes to a different scene. From there, I can continue to build the branching scenes as much as I want, including bringing the learner back to a previous scene, such as you see Scene 3 branching back to the starting scene.
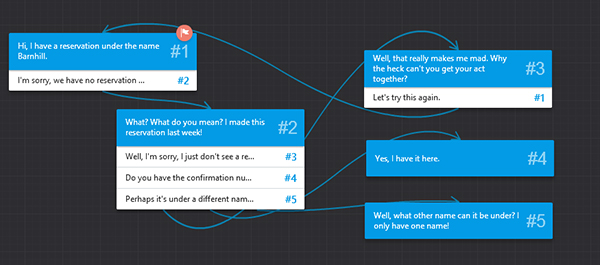
Figure 10: Scene navigation
There’s more to TalkMaster, but I believe I’ve made a convincing case for its usefulness, so let’s move on to the next new feature.
Screen recordings
Yes, you can
now create screen recordings in iSpring. When clicking this option in the
ribbon, it opens a new app called iSpring ScreenRecorder. When you create a
recording, you get a rectangle, such as seen in Figure 11, which you can resize
and position wherever you wish. When you are ready to record, you click the ![]() button. You can also record your own voice by
turning the microphone on
button. You can also record your own voice by
turning the microphone on ![]() .
.
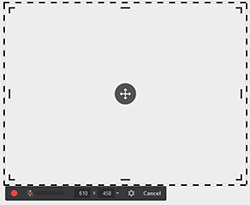
Figure 11: The recording rectangle
The end result can be saved as a true movie, meaning that’s it’s capturing the whole time it’s recording rather than only when you click on items, as is true of the default options in other screen recording tools. This gives you a faithful rendering of what was happening during the recording, at the cost of a larger file.
After capturing the video, you’ll see the dialog in Figure 12, which gives you options to edit the video, save it, or upload it to YouTube.
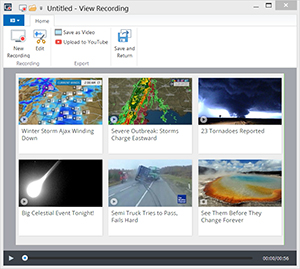
Figure 12: The recording dialog
Figure 13 shows the iSpring Video Editor.
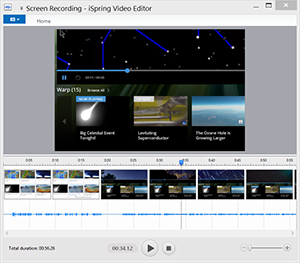
Figure 13: The video editor
The Screen Recording and Video Editor tools are very straightforward and will serve you well as long as you don’t need more features, such as those you find in products like TechSmith Camtasia or Adobe Captivate. Very often, all you need is a nice screen recording with no extra bells or whistles, and this fits the bill nicely.
What else is new?
Here are some of my other favorite new features in iSpring 8:
- A new Video Lecture Player is included. This lets you have two windows on the screen, the lecturer (basically a video of a person), and presentation slides. The learner or viewer can change the size of the video and slide windows as desired.
- The iSpring Viewer, previously available as an iPad app, is now also available on the iPhone. The app for either platform is free and it allows learners to save presentations and lessons onto their device so that they can watch them at any time, even when an internet connection isn’t available.
- Several options have been added to quizzing in iSpring. The quiz editor has been enhanced and is more flexible.
You can see the full list of new features here. Download the trial and see if it meets your needs. iSpring has improved tremendously since its early days and you may find it not only easy to use, but, for a PowerPoint add-in tool, it is pretty powerful too.
By the way, iSpring will be releasing TalkMaster and ScreenRecorder as standalone products before year’s end as well.


