Every rapid development tool has a finite number of native features, but when more sophisticated designs demand customization, a tool’s ability to integrate custom code can be the difference between acceptable and remarkable learning experiences. eLearning developers usually underestimate Lectora, though one of its great strengths is the ability to integrate custom code alongside the out-of-the-box features.
Use cases for custom code integration
Even a novice coder can write and embed simple code to meet design demands. Let’s take a look at a couple of use cases for custom JavaScript.
Control access based on launch date
A client engaged my team for services, and we defined the work effort and timeline. However, as development began, it became clear that the program would be better rolled out in phases, one topic at a time. My team could not extend our engagement beyond the defined scope, and the client wanted to ensure that people were not working ahead in the program. Therefore, we needed a way to set up the course so that each section would only be accessible after a specific date.
While Lectora has reserved variables for the current date and time, they’re not in a format that is easy to test against. JavaScript keeps time by counting the seconds elapsed from January 1, 1970, providing a way to easily test the current date against the desired launch date. Using one line of custom JavaScript, we were able to structure the program with the best instructional design without compromising scope or timeline.
Determine user’s browser size
“Responsive” is all the rage at the moment—the ability to develop a single piece of content that automatically adjusts to the user’s device. While true responsive design adapts dynamically to a user’s device and features scaling between break points, a compromise when using a tool that doesn’t accommodate true responsive design is to automatically direct users to a version of the material that is appropriate for their device.
Ultimately, how you address multiple devices is a design decision—should you redirect users to a version of the course that is best for their device? Should you recommend users re-launch the course on a different device? Should you recommend users maximize the browser on a laptop? However you decide to respond to different devices, determining browser size is paramount. Leveraging JavaScript to determine each user’s browser height and width allows you to implement whatever design decision is appropriate for your unique situation.
So, how do you get JavaScript up and running in Lectora?
Short and sweet JavaScript integration
One of the native options in Lectora Actions is “run JavaScript,” which makes for easy set-up of short functions. For example, in the phased rollout use case above, we need just one line of JavaScript. Here’s how we set that up using Lectora’s Action object.
Let’s say the April section can’t be accessed until April 1, 2015. Use http://www.epochconverter.com/ (or a comparable site) to determine the Epoch value of April 1, 2015. Figure 1 shows you how this works.
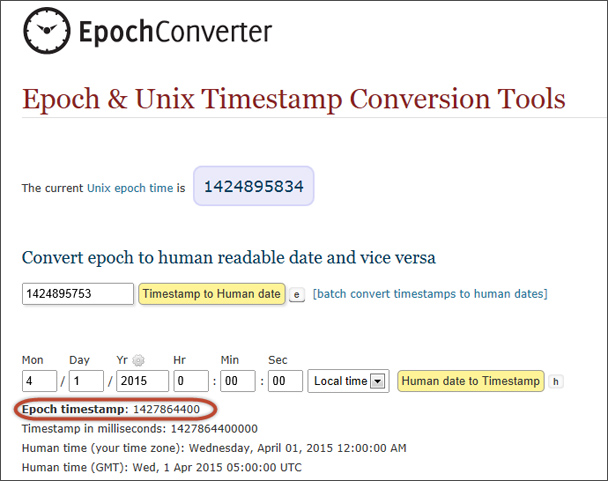
Figure 1: EpochConverter
Next we need to know when the user tries to access the content, and capture that value in a Lectora variable so we can use native Actions. Here’s how:
1. Add an Action to the desired object.
2. For the Action and Target, select Run JavaScript (Figure 2).
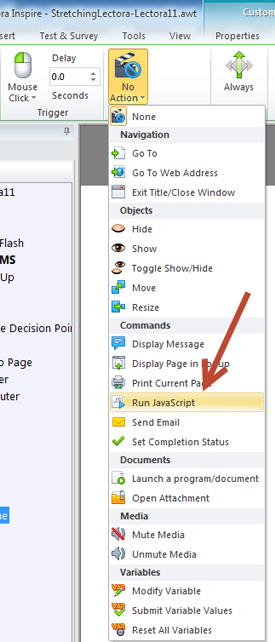
Figure 2: Running JavaScript
3. To capture the current JavaScript Epoch date in a Lectora Variable, enter the following JavaScript in the text box (arrow in Figure 3):
Var_today.set(Math.round(new Date().getTime() / 1000))

Figure 3: Enter the JavaScript in the text box to capture the
current JavaScript Epoch date
Hint: To target a Lectora variable in JavaScript, append “Var” to the front of the Lectora variable. For example, in the code above, the Lectora variable is _today, (Var_today when targeted in JavaScript).
4. Use Lectora’s native interface to test if it’s time to launch the content. In our example, let’s add an additional Action to the button (Figure 4).
On: Trigger
Action: Desired Action (in this example, go to Next Page)
Condition: If _today greater than or equal to target Epoch time
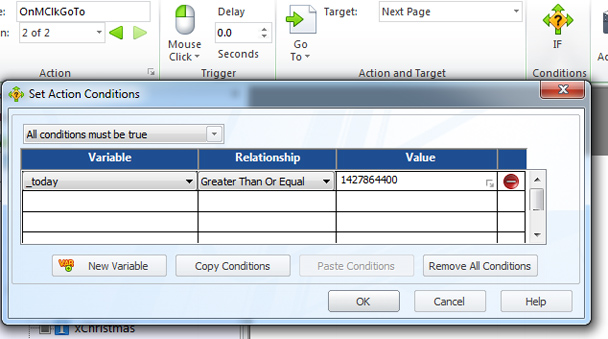
Figure 4: Setting Lectora’s native interface to test if it’s time
to launch the content
Hint: When a Lectora object has multiple Actions with the same trigger, the Actions run in the order they’re listed in the Title Explorer, top to bottom.
For more complicated or lengthy code, we need to become acquainted with Lectora’s HTML Extension Object.
Meet the HTML Extension Object
Lectora’s HTML Extension Object is the key to embedding a lot of custom code. The power of this little scroll is immense. A developer can add ASP, CSS, PHP, Cold Fusion, Shockwave, Java, and JavaScript. The HTML Extension Object is also appropriate to use when coding a JavaScript function that will be activated by multiple triggers, or on multiple pages. For example, in the use case we discussed above about determining the user’s browser size, we will need to write a long JavaScript function that accounts for multiple browser types and versions, and we may want to test the user’s browser height at multiple points throughout the course.
Basics of JavaScript integration using the HTML Extension Object
Before adding the HTML Extension Object, consider whether it should be added to the page, section, chapter, or title level. Generally, add objects to the lowest efficient level. For example, if you plan to use the code on only one page, the HTML Extension should be added to just that page—but if the code will be needed on multiple pages in a chapter, consider adding the HTML Extension Object to the chapter level. In our case, we may want to test the browser size on any page in the title—so we’ll add the HTML Extension to the title level.
1. Add an HTML Extension Object from the Insert ribbon (Add Web Object section) (Figure 5).
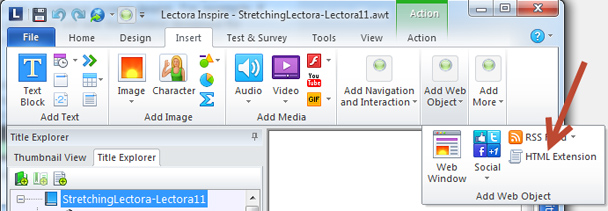
Figure 5: Adding an HTML
Extension Object from the Insert ribbon
2. For the Type, select Top of File Scripting to place your code above and outside the <HTML> tags of the HTML page (Figure 6).
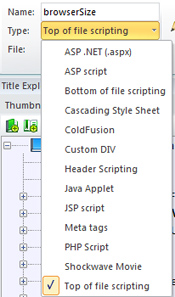
Figure 6: Select Top of File
Scripting to place your code
There are two ways to enter your code. The Edit button (Figure 7) will open a pop-up box, where you can enter your code directly into Lectora. If you prefer to write code in a separate file, use the File drop down menu to attach a file (.txt or .js). This is particularly useful if another person will be writing the code and can send you the file. For this example, we are going to use the Edit button.

Figure 7: The Edit button
allows you to enter your code directly into Lectora
3. To determine the browser height and width, and capture that information in Lectora Variables, enter the following JavaScript in the pop-up box (also see Figures 8 and 9).
 <script>
function browserSize() {
  var myWidth = 0, myHeight = 0;
  if( typeof( window.innerWidth ) == 'number' ) {
    //Non-IE
    myWidth = window.innerWidth;
    myHeight = window.innerHeight;
  } else if( document.documentElement && ( document.documentElement.clientWidth || document.documentElement.clientHeight ) ) {
    //IE 6+ in 'standards compliant mode'
    myWidth = document.documentElement.clientWidth;
    myHeight = document.documentElement.clientHeight;
  } else if( document.body && ( document.body.clientWidth || document.body.clientHeight ) ) {
    //IE 4 compatible
    myWidth = document.body.clientWidth;
    myHeight = document.body.clientHeight;
  }
  Var_browserWidth.set(myWidth)
  Var_browserHeight.set(myHeight)
}
</script>
Script explained (just enough to troubleshoot):
Line 1: Names the function “browserSize”
Line 2: Creates JavaScript variables for width and height, with initial values of 0.
Line 3: Determines if the width can be retrieved from the window object.
Line 4: Code comment*
Line 5-6: Captures window width and height in JavaScript variables using the window object.
Line 7-9: Determines if the width can be determined using the documentElement object.
Line 10: Code comment*
Line 11-12: Captures window width and height in JavaScript variables using the documentElement object.
Line13-14: Determines if width can be determined using the body object.
Line 15: Code comment*
Line 16-17: Captures window width and height in JavaScript variables using the body object.
Line 18: Closes clause.
Line 19-20: Captures value of JavaScript height & width variables in Lectora variables.
Line 21: Closes the browserSize function.
* Anything following two forward slashes in JavaScript is a comment about the code. Put anything you want after two slashes on a single line so future developers know what’s going on in your code.
Figure 8: The script explained line by line
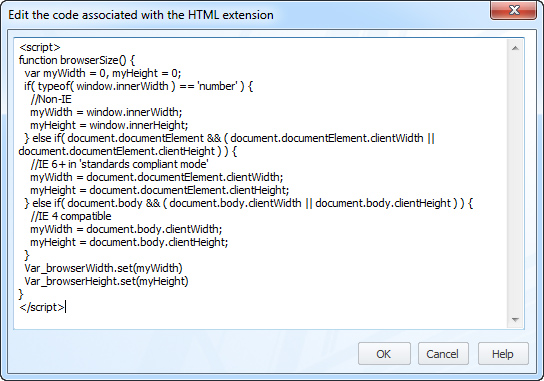
Figure 9: Your script should
look like this when you are done
4. A JavaScript function only runs when triggered, so we’ll use a native Lectora Action to run this script (Figure 10).

Figure 10: Use a native Lectora
Action to run the script
Hint: JavaScript is case-sensitive. If something is not working, double-check your capitalization.
From here, you can leverage the browser height and width however desired, using the native Lectora variables (_browserWidth and _browserHeight).
Stretch yourself and Lectora’s native offerings with a little JavaScript!
When you reach the end of your tool’s native offerings, don’t rush to compromise your designs. Reach for a bit of custom code and your rapid development tool can do more than you anticipated!


