


In part one of this series, we discussed 10 questions to ask before you start to modify someone else’s eLearning project. In part two, we discussed what to look for once you open the files. In this article, we’ll discuss what you should document when you finish the revisions, as well as at the end of every eLearning project.
Developing an eLearning course can take dozens, if not hundreds of hours. The end of the project is often chaotic with last minute revisions, and when you finally get that project sign-off, you just want to sit back, relax and say, “Phew, glad that one’s done!”
But guess what? You really shouldn’t consider the done at that point because there are two more quick steps. The final two steps on every eLearning project should be documentation and archiving. One of the biggest problems with revising someone else’s work is that very few of us take these final steps. They take only an hour or so to do and can save many hours and a lot of headaches for anyone who has to modify your work down the road. Even if that person down the road is YOU (even if you do think you have a photographic memory).
So, I’d like to propose that all eLearning professionals should take these two steps at the end of every eLearning project, whether or not you are the person who will revise this course.
- Step 1: Archive the course files in a place where others can easily find and identify them
- Step 2: Create a publishing guide for anyone who has to edit this course and republish it
Step 1: Archiving
When you archive the course files, take the following actions.
- Clean out your source files and remove items not being used. In Part 2 of this series, we explained how to do this in Captivate.
- Name your files with the course name, number, or something recognizable by anyone who is looking for them. If there are multiple versions of the file, make sure the final version is easily recognizable by the file-naming convention. We try not to use the word “final” in filenames, because it’s the “final” version that is often revised. We recommend using version numbers or dates like “2013-7-14” in the file name. The highest number or latest date is the last version. (Editor’s Note: Remember that in much of the world, the convention is “year-day-month”, or 2014-14-7. This could be important in international organizations.)
- Make sure that you load both source and published files in a logical place where they would be likely to be found, such as on a SharePoint site, company server, or cloud-based site. Source files are the editable files that you would need to revise the course. For example, in Captivate these files will have a .cptx extension; in Storyline, they will have a .story extension. Be sure the storage place is, essentially, locked down so that someone who doesn’t know any better won’t be able to easily remove the files.
- Post the publishing guide in the same location as the source files.
Step 2: Create a publishing guide
A publishing guide provides important information for anyone who has to revise and re-publish the course. It should include the following items:
- Your name and contact information as the original developer
- What product and version you used to create this course
- The number of modules in the course and the module names
- The filenames of the source files
- The file name of the course template
- The types of interactions and media found in the
course. For example, mention if there is…
- Branching
- Voiceover, including contact information for the Voice Talent
- Timed animations
- Media files, and if so, what type (.swf, .mp4, etc.)
- Interactions built in Engage, Raptivity, or another tool
- Questions, and whether they are for practice, pretests, or posttests (or any combination of these)
- Any other elements that aren’t typical (e.g. custom Flash or JavaScript)
- How completion is measured (e.g. page views, test scores, etc.)
- The intended delivery platform, such as a LMS or Web server
- The minimum technical specs for delivery of the published files, for instance, which browsers and Flash versions are supported
- What standard you used to publish the files, if any (AICC, SCORM 1.2, SCORM 2004, Experience API)
One of the easiest ways to write a publishing guide is to do it while you are publishing the final version of the module. If you take screen grabs of all the settings and filenames during the publishing process, you have a good record that you can pass along to someone else. Paste them in a Word document as you go. Then you just need to add a little text around the screen grabs and save the Word file.
For example, Figures 1 and 2 are screen grabs from Articulate Presenter ‘09 that provide a wealth of information for anyone who might need to republish this course. Figure 1 includes the course title, template name, and SCORM version.
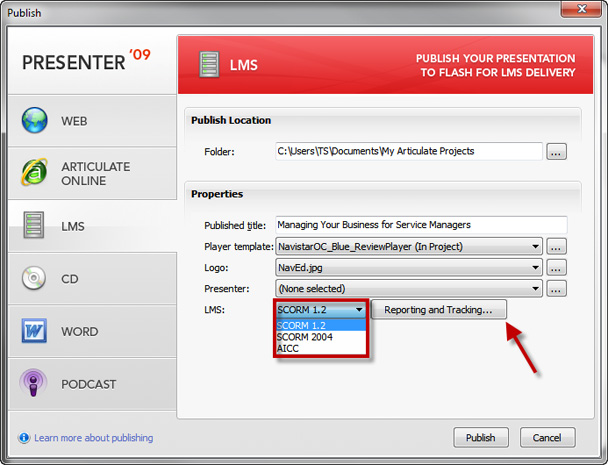
Figure 1. Articulate ‘09 Presenter LMS settings
Figure 2 is a screen grab from Articulate Presenter ‘09 showing
how completion is measured.
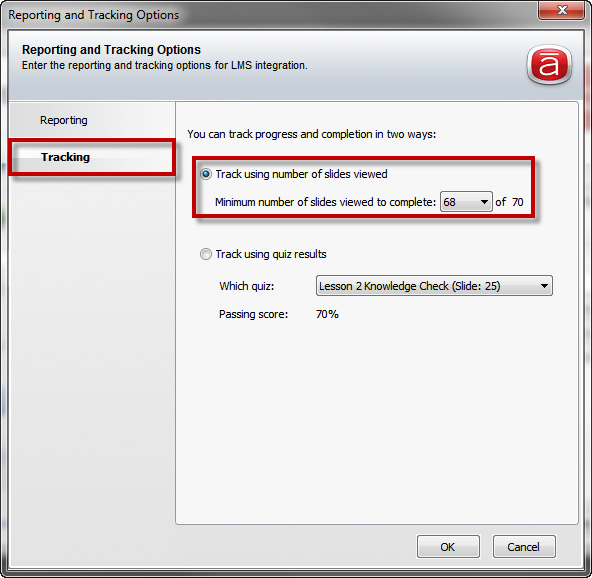
Figure 2. Articulate Presenter ’09
Tracking options
Figure 3 shows a similar screen grab from Adobe Captivate 7.
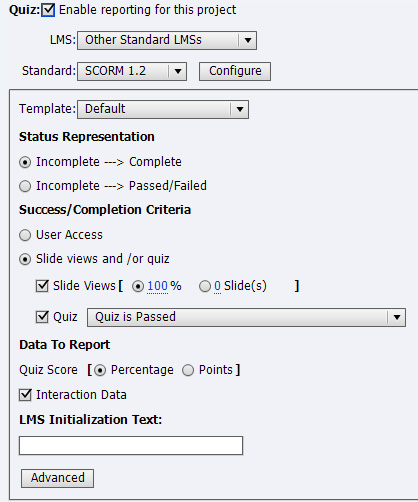
Figure
3. Adobe Captivate 7 Quiz Tracking options
Using this screen-grab technique makes it is very easy to create a publishing guide during the final publishing process.
We would love to see more properly archived and documented projects. It would make life easier for everyone who has to modify someone else’s course. So, let’s all make a pact for the entire community: agree to make life easier for your fellow eLearning professionals by properly archiving and documenting your projects, please indicate your agreement in the comments area below or by liking this article.