


Dot releases for software are usually reserved for bug fixes and minor updates to current features. They usually don’t include new, useful features. The newest version of Adobe Captivate 2019 (V11.5.1.499) bucks the trend by including some cool new capabilities. While these features are discussed on the Adobe site and on various blogs, I’m basing my review on what I really like about this update and I include my thoughts on those features that perhaps I probably will not be using.
To start, these are my five favorite ones because they let me work faster and more efficiently.
1. Hot Swap Images
Up until now, if you wanted to replace an image on the stage, there were several methods but each one took several clicks of the mouse. Captivate now has a new method that requires a simple click and drag, and I love it.
Find the new image in File Explorer (Windows) or Finder (Macintosh), or in Captivate’s file library, then drag it on top of the image you wish to replace. They don’t even need to be the same format: I’ve tested this with JPG, PNG, BMP, and still GIF images. When you replace the image, the new image will maintain its own aspect ratio but stay within the constraints of the dimensions of the old image. When moving the new image to the old image, you’ll see a blue line appear around the old image so that you can see which is being replaced. This is helpful if you have several overlapping images. You can even replace the image in a smart shape with another image using the same method.
See Figure 1 below. The first image has a width of 442 and a height of 295. Though the new image (dragged from File Explorer) has a width of 3024 and a height of 4032, I dropped it on top of the first image. You can see that it has been reduced to a width of 221 and a height of 295. Warning: As I stress in all the classes I teach, the fact still remains that any image you import into Captivate should already be sized externally to the right dimensions because the image will still be saved in your Captivate source file at its original size (as it should). I see this method really speeding up the process of replacing older images with updated ones I get from my artists.

Figure 1: At left, dragging a new image on top of old. At right, the new image takes on the same height as the old.
2. Images and Scalable Vector Graphics as Buttons
In the early days of Captivate, I would have to cover an image with a click box or transparent button to make it possible for a learner to perform an action by clicking on the image. Later, smart shapes were added and I could fill the smart shape with an image and of course make the smart shape a button. Now images have the same friendly Use as Button checkbox in the Properties that smart shapes have had. The rollover and down states will be the same image. Of course, you can change those states and add others, just as you can with smart shape buttons. This will also speed up your work in Captivate because it saves you several steps just to create clickable images.
The same is now true of Scalable Vector Graphics (SVG) files. I suspect that most Captivate users haven’t used SVG much, but I certainly have. In fact, in my last three projects I used SVG files for illustrations almost exclusively because my clients wanted to be able to zoom in and out of the screen and not see any pixelation of images; they wanted them to be sharp at any size. That’s what SVG files do.
Now that they also include the Use as Button option, it makes my workflow simple. In the past, I couldn’t make SVGs into buttons so the only way I could use an SVG as a button was to use the older idea of covering it with a click box or transparent button. SVG files are usually smaller than raster images (JPG, PNG, etc.) and of course are highly scalable, but they also have another benefit: I can choose to make the whole bounding box around the SVG clickable or just the parts of the SVG within the box. See Figure 2.
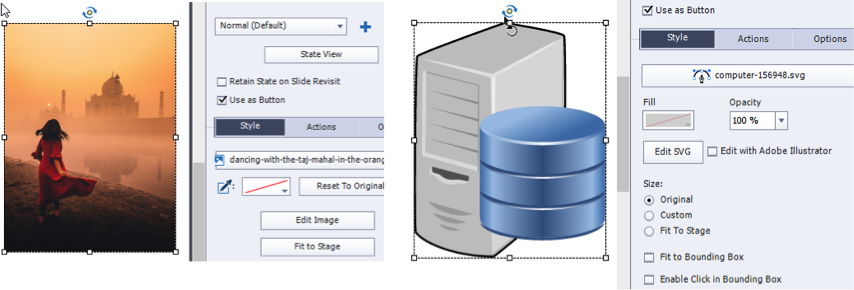 Figure 2: Images and SVGs now have the Use as Button checkbox property
3. Edit SVG Colors Directly in Captivate
Another welcome new feature is that I can now edit the colors in an SVG that is on the stage. Double-click the SVG, then choose the part whose color you wish to change. This is great because I can duplicate a button SVG several times and change the color in each to differentiate them without having to do so in another tool. In Figure 3, you can see how I duplicated the SVG from Figure 2 and changed the color in each.
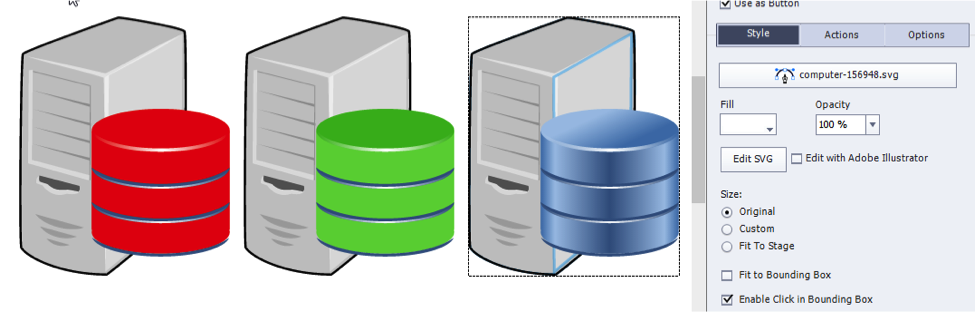 Figure 3: Edit SVG colors directly
4. Copy and Paste Appearance
I’ve long wanted an option in Captivate like that of the Format Painter tool in Microsoft Office products, which makes it easy to copy the appearance of one element to another. For instance, in MS Word, I can point to some text that is 12-point bold Arial and then use the Format Painter tool to change one or more other portions of the text to the same.
Now I can use a similar method in Captivate to make text and smart shapes consistent. Right-click a smart shape or text caption and choose Copy Appearance, then right-click a different smart shape or text caption and choose Paste Appearance. The second text or object will instantly take on the attributes of the first. See Figure 4.
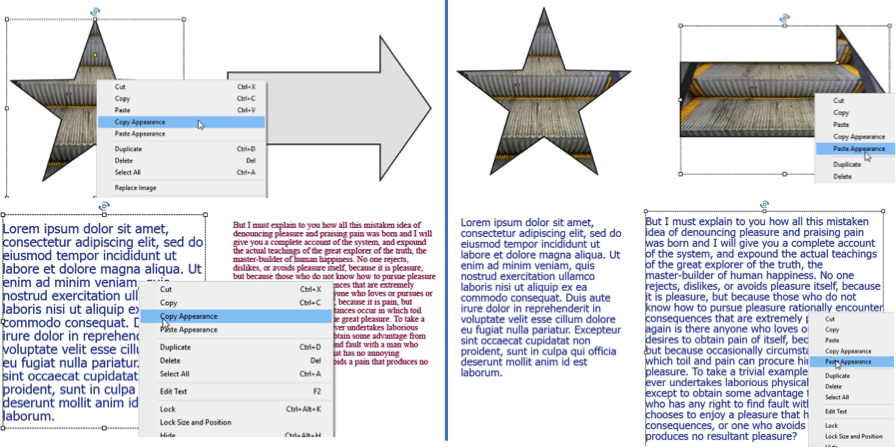 Figure 4: Copy and Paste Appearance
5. Virtual Reality Improvements
Captivate 2019 introduced Virtual Reality in its feature set, playable on headsets and on desktops and mobile devices. While I haven’t had a client who has taken advantage of this feature yet, I’ve played with this quite a bit. A year ago, I bought myself a Samsung 360 Camera for $90 (new) and have used it to take 360° pictures and videos and then import them into Captivate. After inserting the photo or video on a slide, I then place hot spots over it that I can set to show an image or a text field, play audio, navigate to other slides, or ask a quiz question. This update improves the VR features in several ways that make me happy:
- I can now play a video when the learner chooses a hot spot.
- Images, text, and video popups now include a close option so the learner chooses when to close it rather than having the popup disappear after a number of seconds.
- I can now see text elements on the stage when I choose its hot spot and I can edit the font, color, and other aspects of it (as a whole).
- Hot spots can now be reported as quiz items, just as I can with my own interactions in other Captivate files.
- I can now resize hot spots and also add rollover and down states to them. Just as I can edit SVG files on a desktop, I can also edit the colors of SVG hot spots.
Other new features
My top five new features above are not alone. Here are other new features:
- Themes: Several enhancements have been made to Themes in Captivate. For instance, I can now use more than one theme in the same Captivate file! While I wouldn’t overdo this feature, it’s very nice that I can apply a different theme to quiz slides, for instance, to make them stand out. Themes have been useful to me as each client needs their own look and feel, usually to match their organization’s style guide. I’ll see how often I use more than one theme in a file, as I can’t think of too many instances right now when I have wanted this.
- Assets: I like the big change and additions to Assets. The Assets button is now more prominent and clicking it brings up a new interface that now includes both whole projects and slides, along with many new media assets, including SVG icons. It is now easier and faster to download new assets too. For instance, I can download new characters and positions without having to open the dialog each time. This has been frustrating in the past, so I like this option very much.
- Quick Start Slides and Projects: Assets also include this major new category. These brand-new choices include six full sets of projects with all of the standard types of slides many would like, and many that may have not occurred to you and that may inspire you. All of the coding is done for you. You can use the easy image replace option I described above to swap out all the images with your own. I haven’t used too many templates from others in the past, but I always like new design ideas and these include some good ones.
- Multi-Branched Courses and Automated Multi-State Object Interactions. You can now accomplish these types of interactions without having to use variables and advanced actions as in the past. You do this by following some naming conventions for the slides or object states. This makes it easier for those Captivate users who are not comfortable with using variables and actions. However, I will likely continue to use advanced actions and my own variables because they give me added flexibility. I will also continue to encourage others to learn to use these slightly more advanced techniques for that reason.
Convinced?
I think you’ll agree that for a dot release, this update includes a lot of great new features. Of course, it’s a free update to anyone with a subscription to Captivate (go to dropdown menu Help > Check for Updates) so don’t hesitate to update today.
From the editor
Learn more about how to use Adobe Captivate, and provide your learners with much better learning experiences! Joe Ganci will present a day-long, pre-conference session "BYOD Advance Your Adobe Captivate Skills" on October 22 at The eLearning Guild's DevLearn Conference & Exposition in Las Vegas. Register for DevLearn and for Joe's workshop today!